Restoring a Thick-Provisioned Image Export to VMware ESXi
This article describes the steps to restore a thick-provisioned lazy zeroed VMDK or VMDK-linked image export to a VMware ESXi environment.
Use the VMDK export method if you need to copy the image export as thin-provisioned.
To learn more about virtual disk provisioning policies, see VMware's article on the subject (external link).
Environment
- Datto SIRIS
- Datto ALTO
Description
Choosing a file format
- Choose VMDK if you have enough free disk space on the destination hypervisor and if you would like to have the ability to expand the disk size of the virtualization's VMDK files in the future.
- Choose VMDK-linked if storage space on your hypervisor is a concern or if you have to perform a USB transfer of the image export to the datastore and you will not need to resize the disks in the future.
- Currently, exporting VMDK images larger than 2TB is not supported. If you need to export a larger volume, we recommend using the VMDK-linked format instead.
If you select VMDK-linked and need to expand the disk size of the system's VMDK file, resizing will need to be done manually via the ESX Command Line, using vmkfstools -X.
IMPORTANT VMDK-linked formatted files cannot be used by VMware when uploaded directly to the datastore. The hypervisor will recognize the virtual disk as a VMDK file, but once added to a VM, it will be inaccessible and will appear to have a size of 0 MB. You can resolve this issue by copying or moving the VMDK file from one folder to another in your datastore file browser.
Procedure
To export a thick-provisioned disk image for use on VMware ESXi host:
Access the Datto appliance GUI.
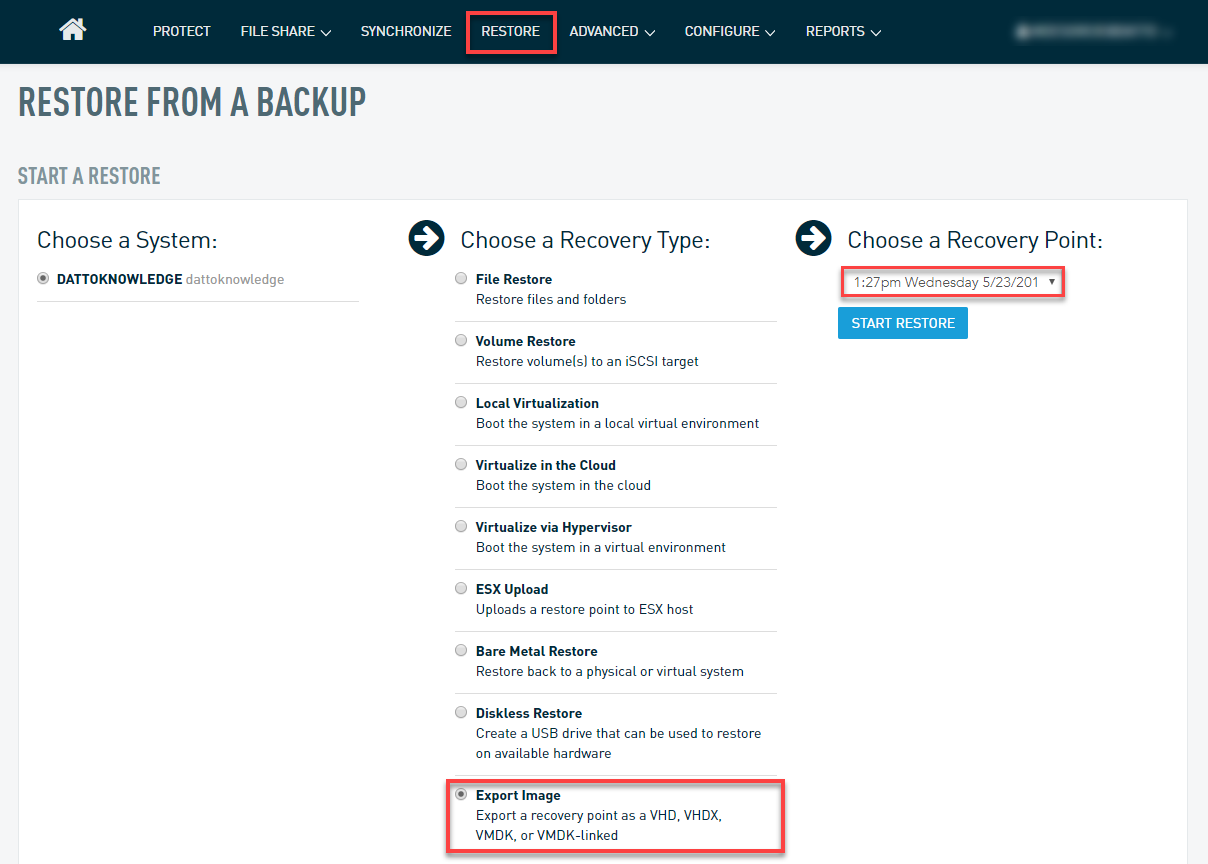
Click the Restore tab.
Select the system to restore, and then click Export Image.
Choose the recovery point that you want to use, and then click Start Restore.
Choose the Destination, this will normally be network share.
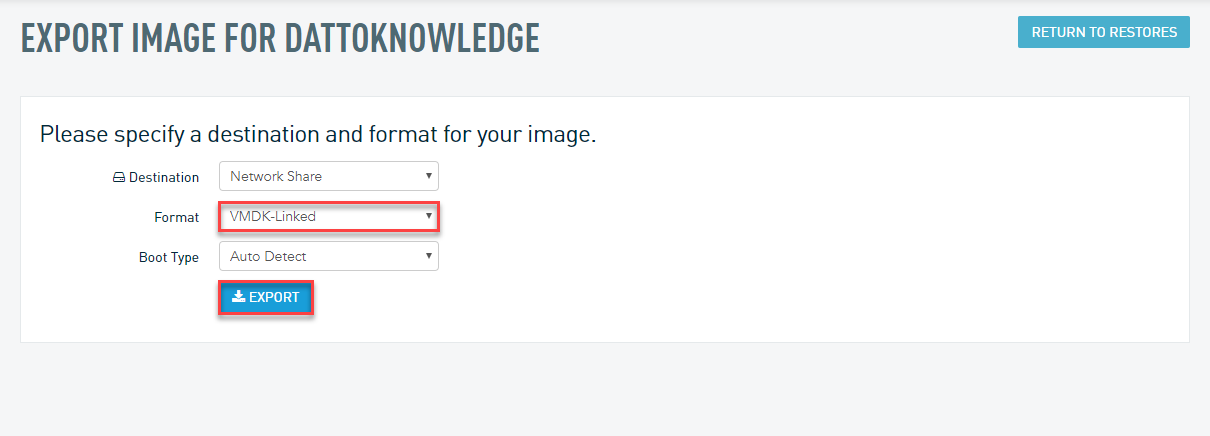
Click Export. The Datto appliance will create a clone of the point you selected and share it on the local network.
The GUI will refresh with new options. Copy the NFS VMDK share path to your clipboard.
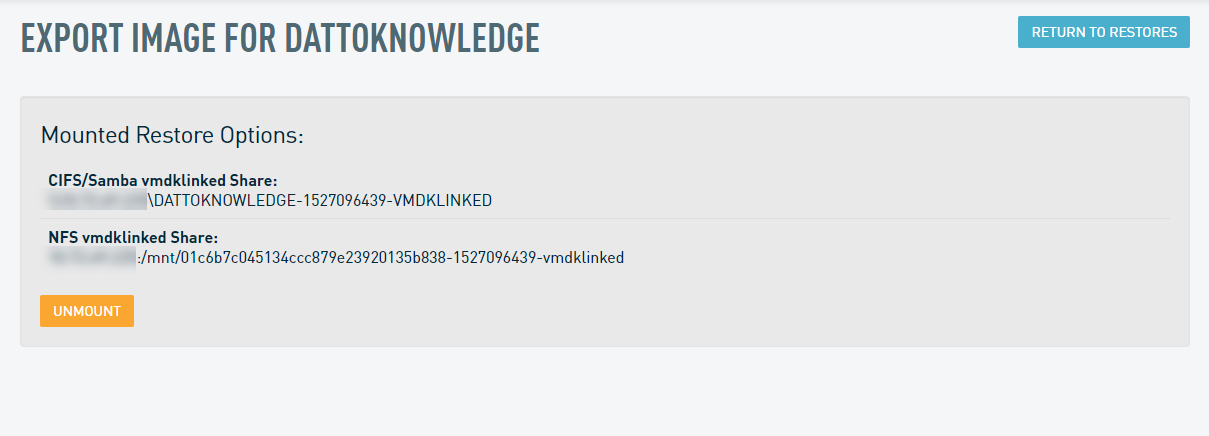
Add the NFS share from the Datto appliance to VMware as a datastore and create the VM if necessary.
Choose a copy method to continue:
Copying the Export to the Datastore via the VMware GUI
Copy the VMDK file(s) and .datto files to the datastore. To do this:
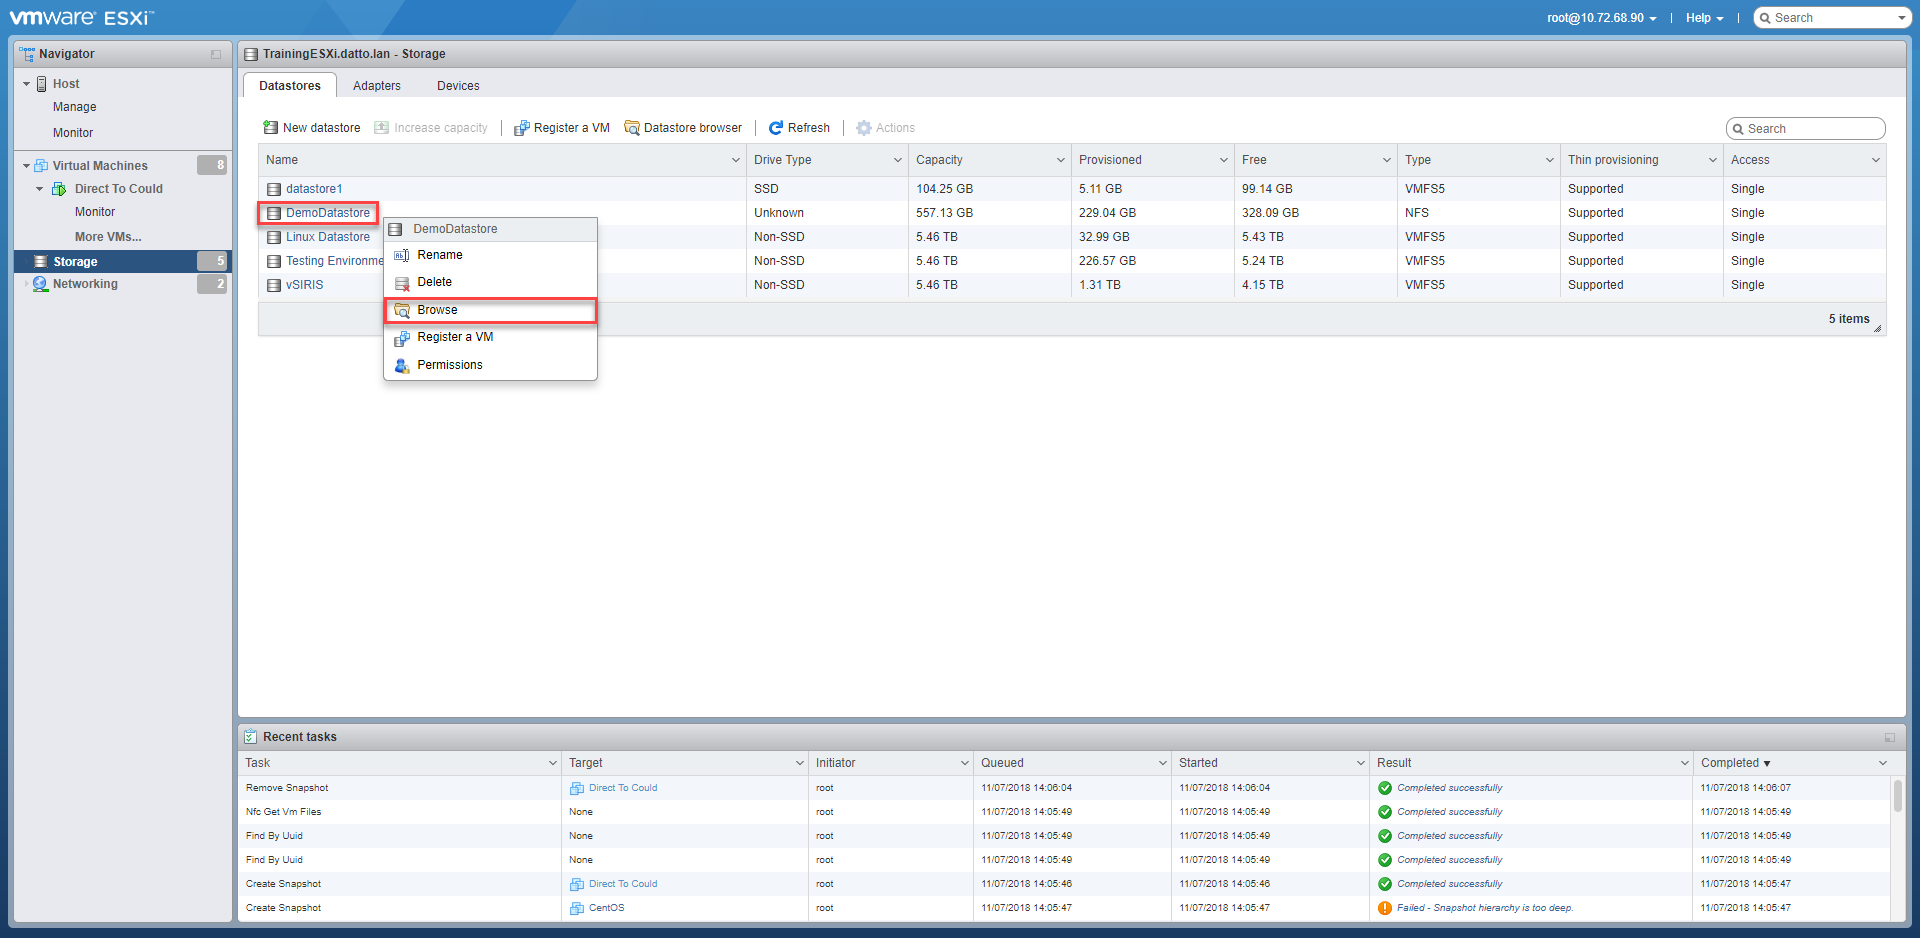
Right-click the datastore you created in Adding a NFS Share from the Datto Appliance to VMware ESXi as a Datastore and click Browse. You will use this as the Source Datastore in the next steps.
You will see a list of virtual disks displayed. Select the disk you'd like to copy and click the Copy button.
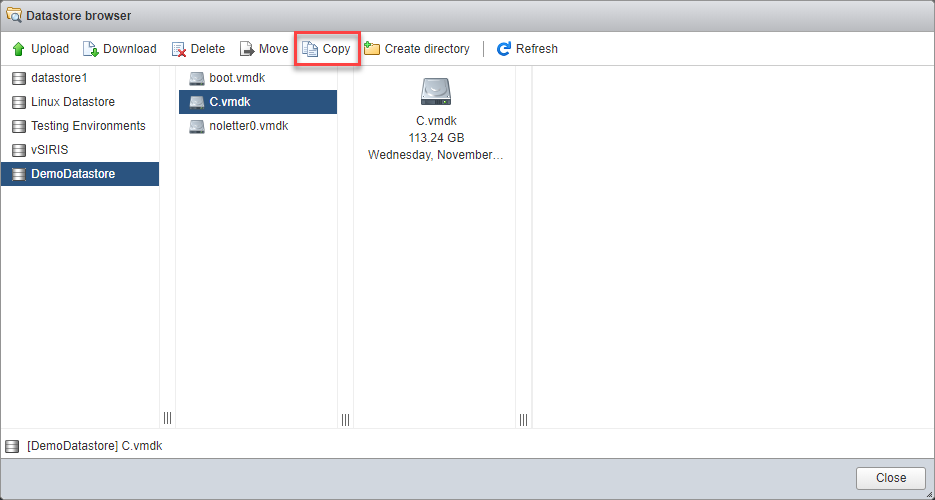
NOTE You will only see boot.vmdk in the export if you selected VMDK-linked as your export option, or if this is a cloud VMDK export. Otherwise, the boot volume will be the lowest-lettered volume of the image export.
In the Select Datastore window, choose the Destination Datastore for the virtual disk.
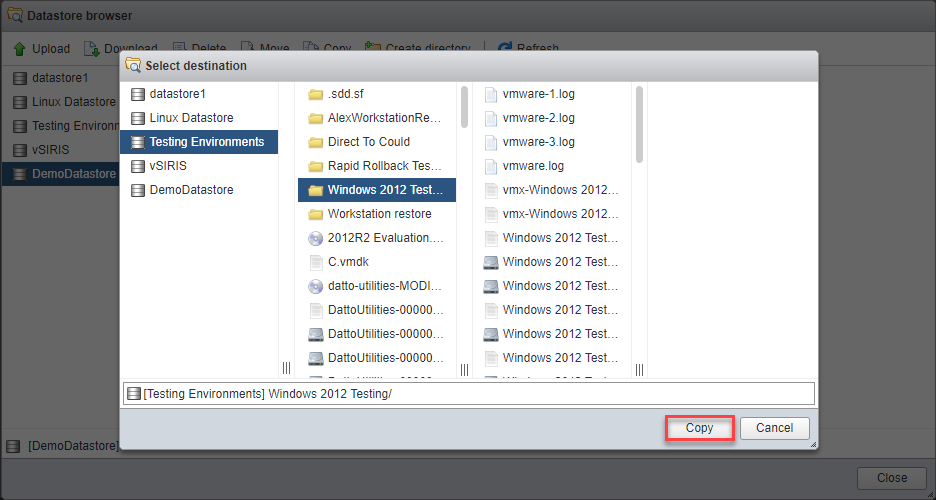
NOTE If you have an existing VM, or you created a new one, select the folder in the datastore associated with the VM you created. If you do not have an associated VM yet, create a new folder in the destination datastore where the VMDKs are needed.
Select the destination datastore and folder, and click Copy. The VMDK will copy to the target. Proceed to the Cleanup section of this article to continue.
Technical Notes
- When you attach the NFS share to VMware as a datastore, you will not see its .datto files if you selected VMDK-linked. Instead, you'll see VMDKs listed as FULL Files. However, both the VMDKs and the .datto files should copy over.
- If you notice that the total file size of the VMDKs is too small after copying, delete the copied virtual disks, return to the Source Datastore, and select Move. The VMDK pointer files will move to the Destination Datastore and leave behind their corresponding .datto files. Move these files to the same destination datastore you moved the VMDKs to.
- The disk image provided by the VMDK export is thick-provisioned. Using the copy method described in this article will result in a thick-provisioned VMDK in the destination datastore. If you wish to copy the VMDK as thin-provisioned, you will need to do so via VMware Converter or through the use of vmkfstools via the ESXi Command-Line Interface (CLI).
- Do NOT copy the .VMX file if it is present. The .VMX file is only useful when using VMware Converter and should not be used to restore the system manually. Follow the steps in Creating a New Virtual Machine in VMware ESXi to create a new virtual machine and attach the recovered .VMDK files to the new virtual machine.
- If there is issues with reading the disk from within the VMware environment after the copy, attempt to re-do the copy using the command line process.
Copying the Export to the Datastore via the VMware Command-Line
To copy the datastore from the Datto appliance to a permanent datastore on VMware with thick disk provisioning, use the following command:
nohup vmkfstools -i /vmfs/volumes/<SourceDataStoreName>/<DriveLetter>.vmdk /vmfs/volumes/<DestinationDataStoreName>/<DriveLetter>.vmdk
The SourceDataStoreName is the datastore you created, which references the NFS share on the Datto appliance. The DestinationDataStoreName is the datastore on your environment to which the disk images will copy.
EXAMPLE nohup vmkfstools -i /vmfs/volumes/Datastore/C.vmdk /vmfs/volumes/HostStorage001/C.vmdk
While not strictly required, the nohup at the beginning of the string is a supplemental command that tells the system not to stop the command once it has started, so the command will keep running until it's done, even if the user that started it logs out. This avoids having to start the full vmkfstools command all over again for the volume if the user's SSH connection gets interrupted or accidentally closed.
NOTE The output of the vmkfstools command only ever displays 99% before returning to the command prompt, therefore the file nohup.out will never show 100%. Once the copy completes, the window the vmkfstools command was run in will be returned to the prompt.
Proceed to the Cleanup section of this article to continue.
Cleanup
- When the transfer completes, access your ESXi environment. If you have not already, create a new virtual machine, or attach the transferred disks to an existing virtual machine as necessary.
- Make sure that the machine's settings match the needs of your environment. Make any adjustments needed.
- If your import process requires a VMX template, you will need to create one before attaching the virtual disks. The Image Export process does not generate a VMX template. Ensure that you add the hard disks when you create the VM template to prevent a temporary issue in which VMDK or VMDK-linked files show as 0 GB in size.
- If you exported a VMDK-linked image: Make sure to attach the boot.vmdk file first, followed by c.vmdk, and then any other applicable drives.
- If you exported a VMDK image: Make sure to attach c.vmdk first, and then any other applicable drives.
- Boot the virtual machine. Make sure that it boots to the Windows login screen. If the virtualization fails after the first attempt, try again with a different storage controller. If the issue persists, contact Datto Technical Support.
- Unmount the NFS datastore you created in Step 10 from your ESXi environment.
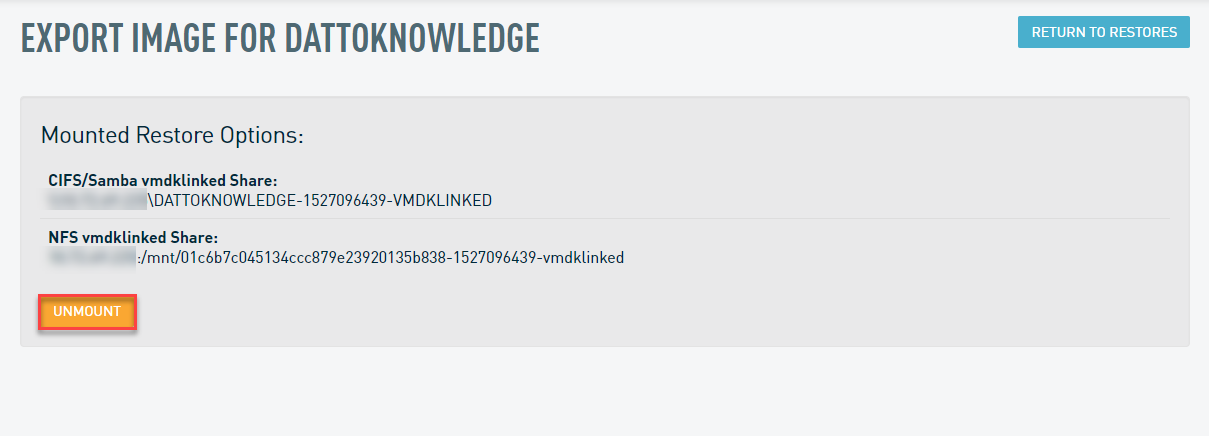
- After confirming that the virtual machine functions as expected, return to the Export Image screen in your Datto appliance's GUI, and click Unmount to remove the shared clone.
