Cloud Network Groups
Cloud Network Groups let you interconnect up to three cloud networks for recoveries in the Datto Cloud that have more complex networking requirements. This article discusses creating, accessing, and viewing cloud network groups for cloud virtualizations in the Recovery Launchpad.
Environment
- Datto Partner Portal
- Recovery Launchpad
Description
The Recovery Launchpad in the Datto Partner Portal lets you quickly create cloud virtualizations and network connections for use in a disaster recovery (DR) or a DR Test. The Recovery Launchpad now lets you create Cloud Network Groups which will interconnect up to three (3) cloud networks so that virtualizations on different networks can communicate. Before creating a Cloud Network Group, you need to first create the cloud networks as usual. Review Networking Cloud Virtualizations for more information on creating a cloud network. You do not need to have any active cloud virtualizations to create cloud networks or cloud network groups. These two steps can be done separately and networks can be setup ahead of time if you prefer.
Creating a Cloud Network Group
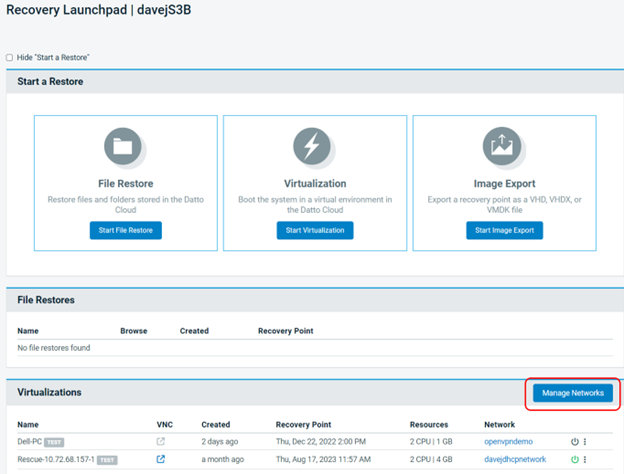
In the Virtualizations card on the Recovery Launchpad landing page, click Manage Networks
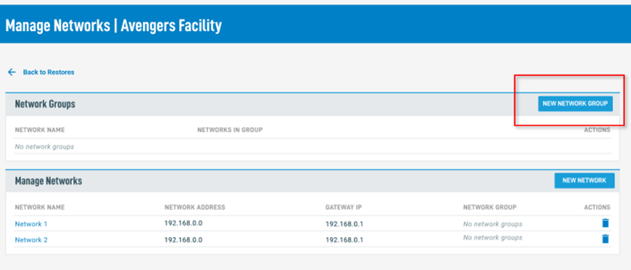
On the Managed Networks card, you will see a new panel showing Network Group information at the top of the page. Click Add New Network Group to get started.
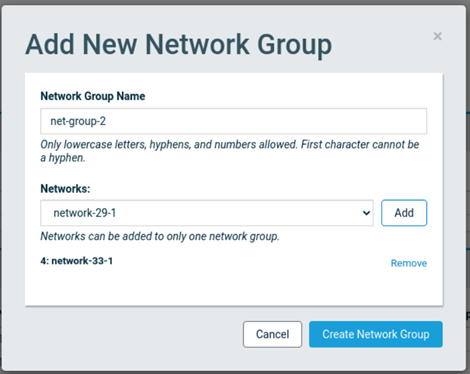
In the Add New Network Group modal, enter a name for the network using lowercase letters, hyphens and numbers, and select the first network to add to the group and select the Add button.
You will see the network you just added to the group now displayed at the bottom and you can now add up to two (2) more networks to the group by selecting the desired network and clicking the Add button. Select the Create Network Group button when finished. When the request is completed, you will see a confirmation message.
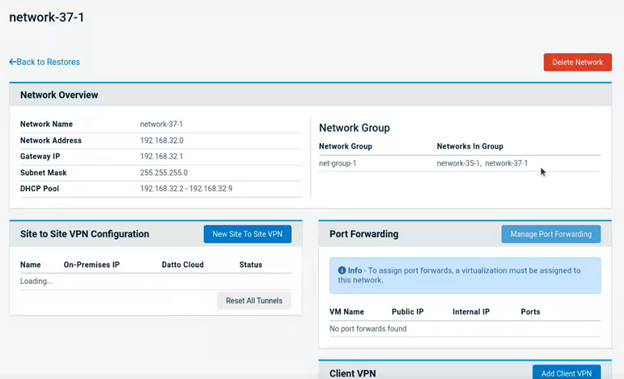
Return to the Network Overview view and you will now see the network group displayed, along with the networks that are in the group.
Editing and Deleting Cloud Network Groups
Return to the Manage Network view and you will see the network group with icons for editing and deleting the network.
To delete a Network Group, select the trashcan icon. Note that only the group is deleted, not the networks that were previously part of that group. Select the Delete Network Group button to confirm your request.
You will receive a confirmation message when the deletion is complete.
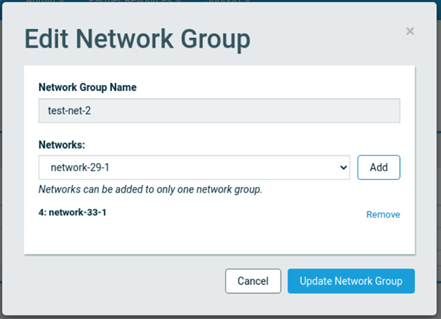
Select the edit option by clicking the pencil icon next to the group you want to edit.
You can add more networks to the group using the dropdown and Add button or remove an existing network from the group using the Remove button. Select the Update Network Group button when finished and a confirmation will display. Click the Close button to return to the previous view.
Considerations
- A network can only be a member of a single network group.
- A network group is currently limited to three (3) member networks.
- You cannot create a network group if it will result in a conflict or overlap of IP networks assigned to the groups, including conflicts with IP ranges and subnets associated with IPsec connections for one or more networks in the group.
- The VPN keys only contain a routing rule for the VLAN network you are connecting to. Additional routing will be required on the organization workstation/server to access the other members of the network group.
NOTE Creation and troubleshooting of static routes in the production environment is the Partner's responsibility and outside the scope of Datto Technical Support. The following is provided for information purposes.
One method for adding routing to the connected machine to the other networks that are a part of the cloud network group is to create a static route for each needed network, through the gateway of the network that is connected via the VPN Key. This can be done in powershell using:
route add <destinationNetwork> mask <subnetMask> <VPNgateway> metric <#>
- destinationNetwork: Network address for the network you are trying to reach.
- subnetMask: Network mask for the network you are trying to reach.
- VPNgateway: The gateway IP address of the network that the machine is connected to, through the VPN key.
- #: The route's metric value, can be set to 1.
For example, to add routes to the networks 10.0.4.0 and 192.168.32.0, when the vpn key is used to connect to 172.16.42.0 and all three are a part of the same cloud network group:
EXAMPLE route add 10.0.4.0 mask 255.255.255.0 172.16.42.1 metric 1
route add 192.168.32.0 mask 255.255.255.0 172.16.42.1 metric 1
