Networking Cloud Virtualizations
Topic 
This article discusses the networking options for cloud virtualization in the Recovery Launchpad including creating, accessing, and viewing networks.
Environment
- Datto Partner Portal
- Recovery Launchpad
Description
The Datto Partner Portal allows for creation of a virtual private network (VPN) for use in a disaster recovery. A mounted cloud virtualization is not required to set up a VPN. These two steps can be done separately and networks can be setup up to 3 days ahead of time if preferred. For instructions on creating a cloud virtualization to access via your VPN, see Performing a cloud virtualization.

Method 1
In the Datto Partner Portal, click the Status tab, then select BCDR Status from the drop-down menu.

In the section for the target device, click the ellipsis icon on the far right-hand side of the screen, then click Recovery Launchpad from the drop-down menu.

Method 2
From the BCDR Status page, click the name of the Datto device.

On the top right of the Device Details page, click Recovery Launchpad.

The options are available at the creation of the offsite virtualization, but may be changed at a later time, while the virtualization is powered off.
| Disconnected | No virtual network or adapter will be provided to the virtualization in the Datto Cloud. |
Simple Networking | Assigns an IP address and provide outbound internet access to the virtual machine. |
Create Network | Creating a new network (VPN) with or without internet, as described in the next section. |
Use an existing Network | Connect the virtual machine to any existing network created under the same organization. |
Although Datto does not restrict RDP for access to cloud virtualizations, it remains one of the primary entry points for ransomware and data breaches. Because port 3389 is a well-known default, it is a primary target for automated brute-force attacks and should be avoided. Security best practices include:
Changing the Port: Many administrators change the listening port to a custom value (e.g., between 1024–65535) via the Windows Registry to reduce "noise" from automated scans.
Additional Protection: Use Network Level Authentication (NLA), a VPN, or a Remote Desktop Gateway instead of exposing port 3389 directly to the public internet.
Enforce Strong Password Policies of at least 16 characters long with a mix of uppercase, lowercase, numbers, and symbols.
In the Virtualizations card on the Recovery page, click MANAGE NETWORKS.

On the Active Networks card, click ADD NEW NETWORK.
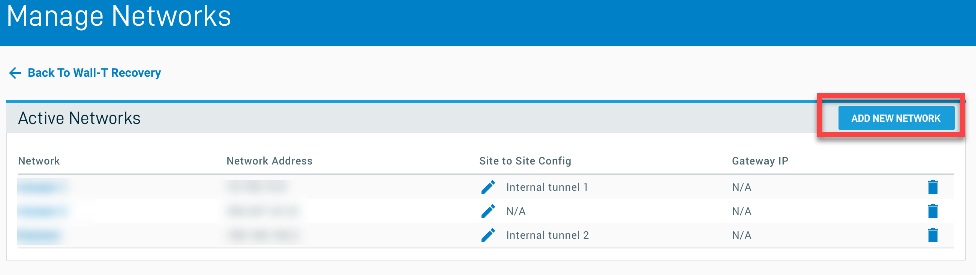
In the Add New Network dialog window, enter the Network Name and Network Address (IP scheme), and the Subnet Mask you want to use. Gateway IP is required and will be auto-populated based on the Network Address you entered, but should be overwritten to reflect your networking scheme. (0.0.0.0 is not permitted for the Gateway IP.
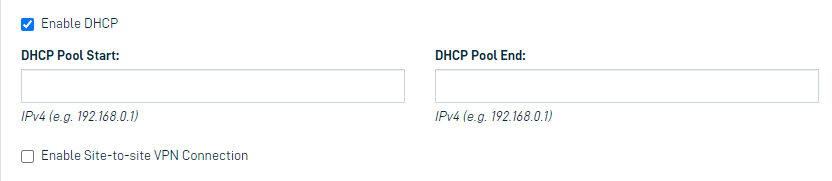
Under Network Options, Internet Connection is checked by default. Uncheck this box if you don't need an internet connection.

Click the Enable DHCP button if you require DHCP assignment of IP addresses to be provided by your cloud network.
Enter DHCP Pool Start and DHCP End IP addresses if you enabled DHCP.
Your network scheme must be RFC-1918 compliant. Also, the following IP schemes are restricted and cannot be used:
- 10.30.130.0/24
- 10.40.40.0/24
- 10.50.15.0/24
- 10.82.16.0/24
- 10.90.15.0/24
- 10.110.15.0/24
- 10.160.15.0/24
- 10.162.15.0/24
- 10.210.15.0/24
- 192.168.122.0/24
The Site-to-Site Configuration allows you to establish secure connections over the Internet between your locations and the Datto Cloud via IPsec, so that your users can easily connect to cloud resources from remote offices.
IPsec tunnels can be added to Datto Cloud networks only after you configure the tunnel on your router or firewall.
Warnings
- Configuring Site-to-Site networks into the Datto Cloud requires some working knowledge of IPsec technology and will vary depending on your equipment at your location(s).
- Incorrect configuration may result in unwanted network access.
- Datto support can only provide minimal assistance in configuring these tunnels, due to the wide array of available networking equipment and configurations.
- The Site to Site VPN feature is not available on SIRIS Private service plans
About VPN Tunnels
IPsec VPN negotiations happen in two distinct phases between the devices at each end of the tunnel. These negotiations are required to build the VPN tunnel, and include a series of messages about encryption and authentication in an attempt to agree on the required VPN parameters. In Phase 1, the devices set up a secure encrypted channel so that they can negotiate Phase 2, where they agree on an additional set of parameters that define what traffic can go through the VPN and how that traffic should be secured. The Phase 1 and Phase 2 configurations must match for the devices on either end of the tunnel.
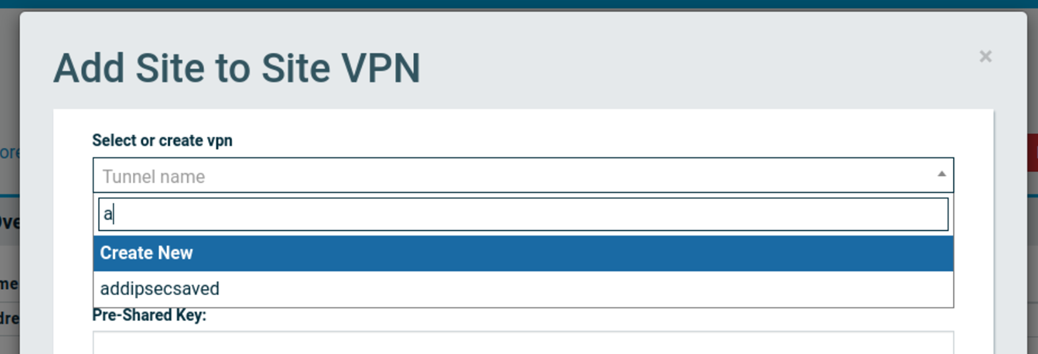
To use the site-to-site option, click the box labeled Add New and select New Site to Site VPN from the options. You will be taken to the Add Site-to-Site VPN Configuration view, where you will enter the settings for each IPsec tunnel.
Select Create New from the dropdown to enter a new IPsec configuration, or select a saved configuration from a previous session. You will only see tunnels that were previously created on this network, if you are on the same SIRIS device that created the network.
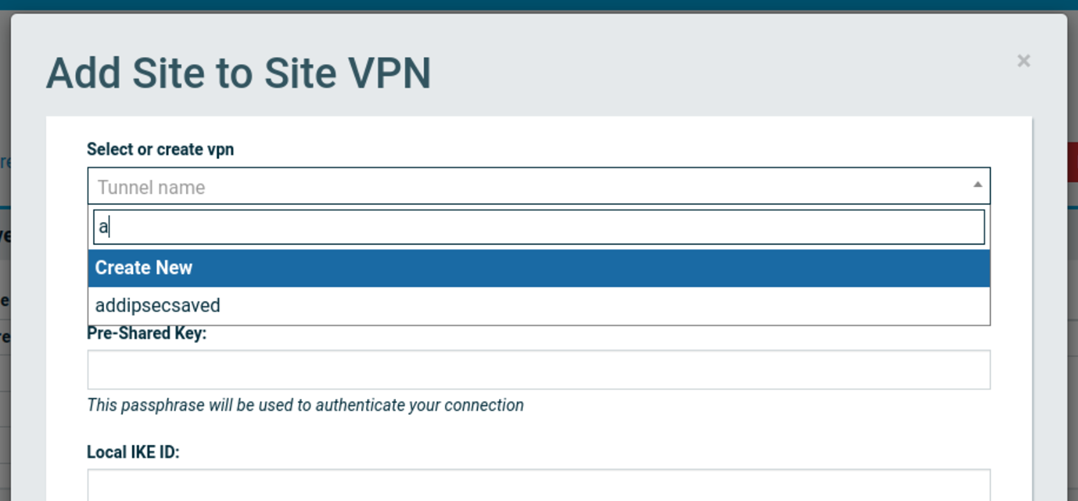
The previous configurations can also be removed by selecting the trashcan icon.
When selecting a previous configuration, skip to the Cloning a Site-to-Site IPsec VPN Tunnel from History section below. When creating a new configuration, specify the following parameters for each tunnel:
- Site-to-Site VPN Name: A name you define to identify this connection in the portal display. Up to 25 characters.
- IPsec Mode (drop-down menu): Select the IKE Mode the client will use to connect (IKEv1 or IKEv2).
- Pre-shared Key: Create a pre-shared key that will be used to communicate securely with the client. Any client you connect will need to communicate by using this key.
- Local IKE ID: Based on your local router, enter the local IKE ID for the on-premises device.
- On-Premises IP: The IPV4 address for your on-premises router (e.g. 8.8.8.8).
- On-Premises Subnets: A comma-separated set of CIDR subnets that will access the connection. The same restricted IP ranges as above apply, however, you are allowed to enter /32 non-RFC-1918 Compliant on-prem IP addresses, if needed. (0.0.0.0 is not permitted).
Ensure any identifier type selection on your firewall most closely matches the format of the value you have configured in the portal.
Click the Add button to save the on-premises subnets to the configuration.
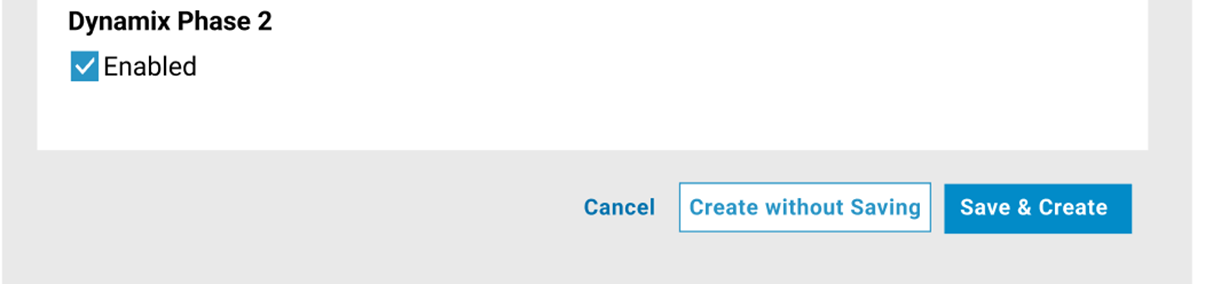
The remaining fields are pre-selected with the recommended default settings. If needed, change these IPsec policies and parameters for both Phase 1 and Phase 2. See the Phase 1 and Phase 2 parameters section below for an explanation of the settings. Otherwise, proceed to Step 5.
After reviewing the new network settings, save the configuration for future use or create the network without saving. To save the configuration select Save & Create otherwise select the Create without Saving button at the bottom right of the dialog window.
Cloning a Site-to-Site IPsec VPN Tunnel from History
If there are any previously saved any IPsec configurations they will appear in the dropdown box. The search can be used to navigate to a particular saved configuration.
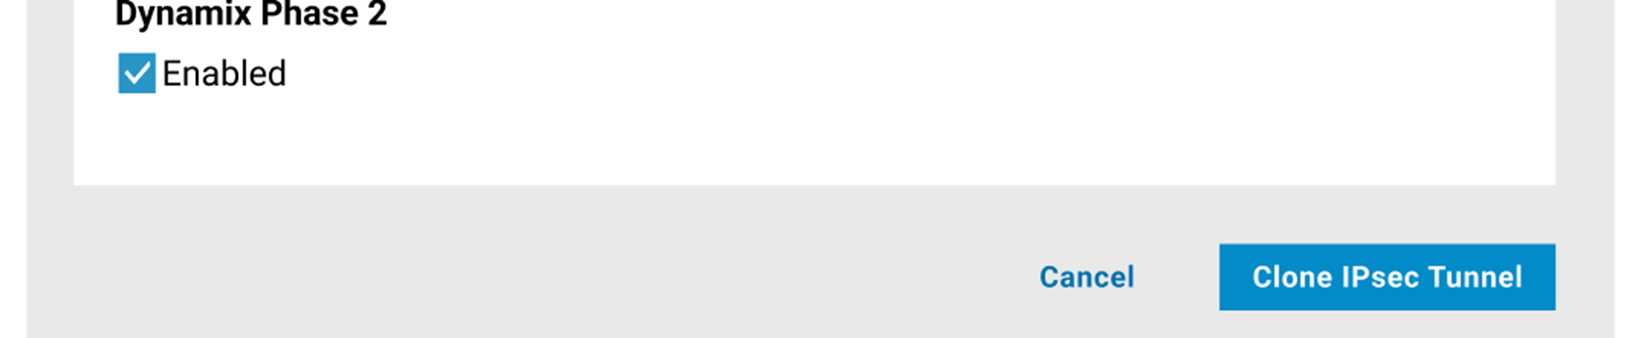
After selecting a previous configuration, select Clone IPsec Tunnel button at bottom of window to continue with the exact configuration. If changes are needed, any of the previous configuration settings may be edited before proceeding.
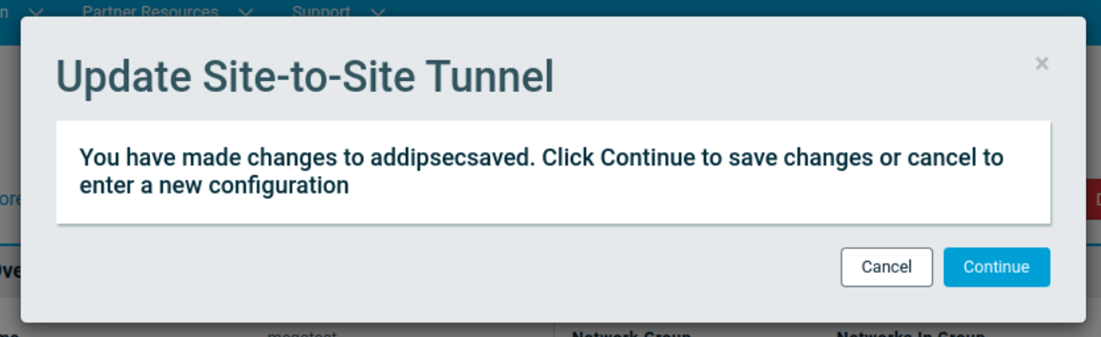
If changes are made to a saved configuration, a prompt will appear with the options to Continue and save the changes or Cancel and be returned to previous screen, where new configuration could be created, using the instructions above.
If you subscribe to Datto Networking Secure Edge service, you can quickly connect your Secure Edge SASE Gateway to a cloud VLAN in the Datto BCDR Cloud using an IPsec site-to-site connection.
This allows you to quickly establish secure connections between your end users/locations and the Datto Cloud via IPsec, so that your users can easily connect to Datto cloud resources from remote offices during disaster recovery tests and events.
IMPORTANT You must already have an existing Secure Edge gateway to utilize the services.
Creating a Site-to-Site IPsec VPN Tunnel to your Secure Edge Gateway.
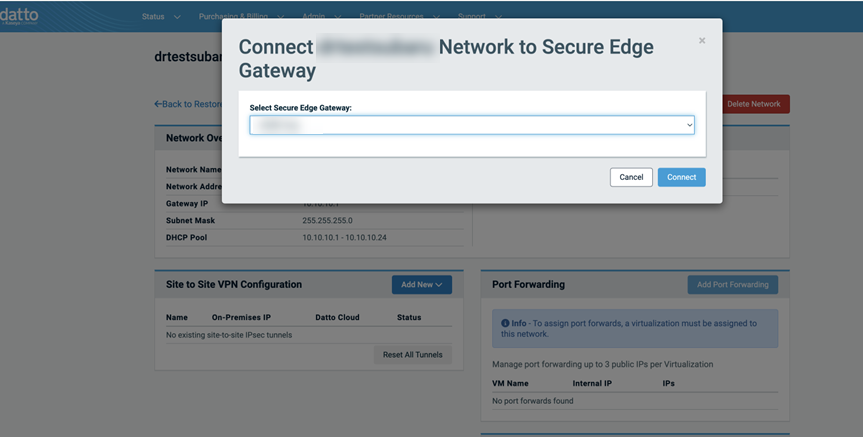
Navigate to the Network Details view in the Recovery Launchpad. If you are a Datto Networking customer, under Site to Site VPN Configuration, there will be a drop down for Add New, including the option to select Secure Edge.
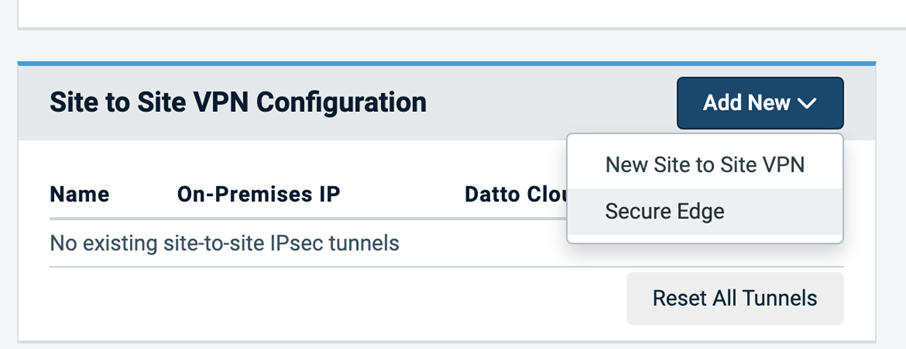
By selecting the Secure Edge option, you will see a new modal with a drop-down selector that will display all of your Secure Edge Gateways.
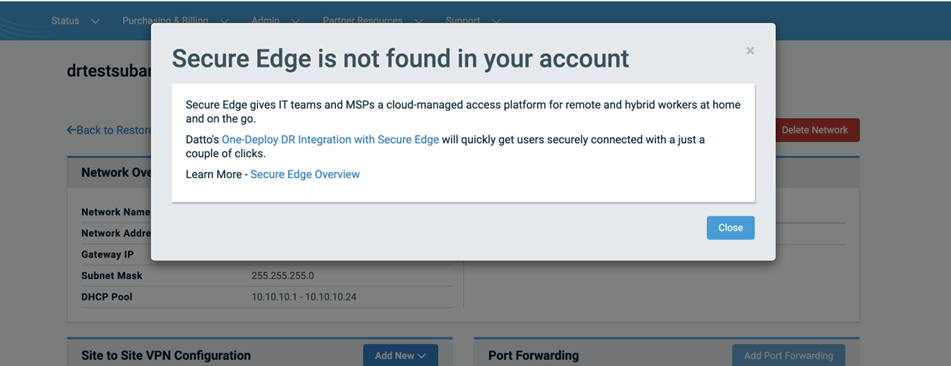
If for some reason no available Secure Edge gateways are identified, you will see a notification providing more information on the service.
Select the desired gateway, then select the Connect option to continue. This will configure both ends of an IPsec connection to connect your Secure Edge Gateway and the associated Datto Cloud VLAN.
After the tunnel is created, you will see the tunnel details and status in Recovery Launchpad. Secure Edge connections will begin with the SE_ prefix and will display the Secure Edge icon in front of the tunnel name.
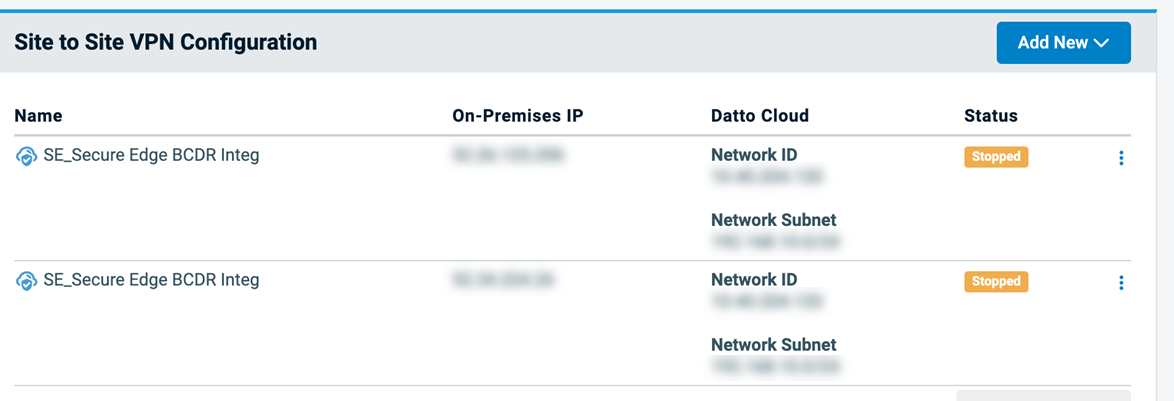
After the tunnel is created, you will see the tunnel details and status in Recovery Launchpad. Secure Edge connections will begin with the SE_Prefix and will display the Secure Edge icon in front of the tunnel name. Tunnel Status will remain Stopped until traffic is detected across the tunnel in either direction or the tunnel is reset using the menu option from Recovery Launchpad.
When your DR event or test is complete, return to Recovery Launchpad and delete the tunnel from the action menu, just like any IPsec connection.
Considerations
Deleting the tunnel from Recovery Launchpad will only delete the Datto Cloud portion of the connection. You must delete the Secure Edge Gateway IPsec connection from the Secure Edge Gateway portal.
Editing the Name of the IPsec connection to remove the SE prefix will remove the Secure Edge icon from the connection as displayed in Recovery Launchpad.
IPsec connections to Secure Edge utilize pre-determined encryption and IPsec configurations which cannot be edited.
Only one IPsec tunnel can be created between the same Secure Edge gateway and the same BCDR cloud VLAN.
Managing Your Site-to-Site IPsec Tunnels
View a summary and the status of existing tunnels from the Site-to-Site VPN Configuration View panel in the Network View.
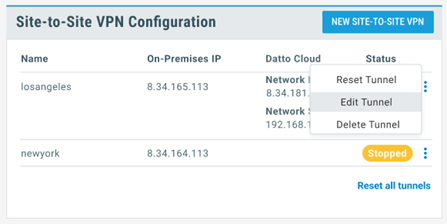
Hovering over the options icon to access the following:
- Reset Tunnel – resets the selected tunnel
- Edit Tunnel – takes you to tunnel configuration view where you can adjust and save settings
- Delete – removes the tunnel from the cloud network
Select Reset all tunnels to perform a network reset for all IPsec tunnels connected to the selected cloud network, if needed.
Additional Site-to-Site IPsec Tunnel information
Phase 1 and Phase 2 parameters (optional)
When creating a site to site VPN, these settings are set to their most common configuration by default. You may need to change these settings based on your particular router/firewall manufacturers' recommendations. If you need to change the settings, the following options are available:
- Encryption Algorithm: Allows you to specify what encryption algorithm is used. The Triple Data Encryption Standard, AES-128, AES-192, and AES-256 are available.
- Hash Algorithm: Allows you to specify what hash algorithm is used. SHA1, SHA256, SHA384, and SHA512 are available.
- DH Group:Allows you to specify what Diffie-Hellman exchange (DH group) is used. The following groups and moduli are available:
Regular Groups
- Group 14: 2048 bit
- Group 15: 3072 bit
- Group 16: 4096 bit
- Group 17: 6144 bit
- Group 18: 8192 bit
- Group 23: 224 bit
- Group 24: 256 bit
- Group 25: 192 bit
- Group 19: 256 bit
- Group 20: 384 bit
- Group 21: 521 bit
- Group 27: 224 bit
- Group 28: 256 bit
- Group 29: 384 bit
- Group 30: 512 bit
Prime Order with Prime Subgroups
NIST Elliptic Curve Groups
Brainpool Elliptic Curve Groups
Lifetime (seconds): Allows you to specify, in seconds, how often the IPsec tunnel is renegotiated. The default is 86,400 seconds.
Dead Peer Detection: Dead Peer Detection (DPD) is the method to detect the status of a peer in an IPsec connection. You can enter the time in seconds before the connection will be dropped due to an unresponsive peer.
NOTE Check your specific router/firewall documentation before changing the default settings.
NOTE In preparation for FIPS compliance, all non-FIPS approved algorithms and ciphers are being removed from Recovery Launchpad. If you have problems connecting to cloud restores, you should first verify that you are attempting to connect with FIPs compliant algorithms for encryption, hashing, and signing.


