Screenshot Verification failure: Active Directory blue screen
This article describes troubleshooting a restored Active Directory machine or screenshot verification receiving either error:
"STOP: c00002e2"
"0xc00002e2"
Environment 
- Datto SIRIS
- Datto ALTO
Description
Connecting via VNC 
To perform the troubleshooting steps in this article on a local virtualization, you must allow the VNC window popup in the browser you are using to connect to the Datto device. Once you bring up the VM with the steps below, it will be necessary to connect to it with VNC. 
Troubleshooting common causes
Verify that the Datto appliance is backing up all volumes holding Active Directory data. Missing database files can cause a STOP: c00002e2 (external link)error. The database file ntds.dit commonly causes this. If you discover that a volume holding Active Directory data was excluded from the backup, include the volume, and then start a backup from the Protect tab of the appliance GUI.
The default path to the database is as follows:
C:\Windows\Ntds\ntds.dit
If a custom path was configured, Windows stores the location of the NTDS database, in this registry key:
HKLM\SYSTEM\CurrentControlSet\Services\NTDS\Parameters
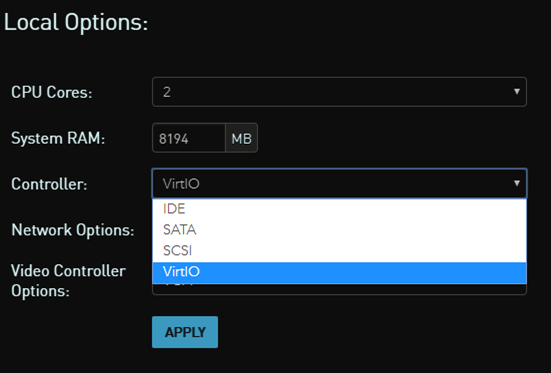
Try to virtualize with each storage controller. In some instances, if the VM is using an incorrect storage controller, the restore will boot to a 2e2 error.
In Configure Agent Settings > VSS Writer Exclusion, make sure NTDS is not checked. The NTDS Writer is important for properly backing up these database files.

Ensure you are not receiving VSS failures in the backup agent logs, and check the state of vss writers on the server during a backup. Refer to VSS: Description, Compatibilities, and Troubleshooting Resources, for more information.
If you are experiencing a 2e2 error message during an offsite virtualization, boot into DSRM mode (on the domain controller) and change the system date to the date of the restored point.
For example, if the backup is from July 10th at 2:00 pm EST, and you are booting on July 22nd, boot into DSRM and change the date back to July 10th at any point before 2:00 pm EST.
Booting up the Virtual Machine on the Datto in Directory Services Restore Mode
The general steps for booting into DSRM mode are the same for all restore types.
If the production machine is still working, it can be reset.
Open an administrative command prompt.
Run the following
ntdsutil
Set the dsrm password.
Reset the password on server null.
Enter a new password twice.
Datto Support can assist with attaching partner provided recovery ISOs to virtualizations to facilitate password resets. Partner responsibilities in these cases are:
- Obtain the recovery disk / ISO.
- Create a public share on the Datto device to house the ISO.
- Syncing the public share to the cloud if the ISO is needed offsite.
- Booting to said recovery disk and making the necessary registry changes.
Start a local virtualization with networking enabled. If the production machine is still live on the network, use the Firewalled on a private subnet or the Firewalled on a private subnet, with no Internet access option.
While the VM is booting, use the connect to VNC option by clicking on the preview window.
When the VNC connection is up, click restart in the Datto UI to restart the virtualization.
The virtual machine will start to boot on the screen. Immediately press F8 to get to the Advanced Boot Options screen. If access fails, power down the VM and repeat the previous step.

From this screen, select Directory Services Restore Mode.
Once you are booted into the server
There is an event log that should log the specific cause of the 2e2 error, which is available when booted into DSRM mode and may speed up the troubleshooting process. To access the log, open the Windows Event Viewer and navigate to Application and Services Logs > Directory Services.
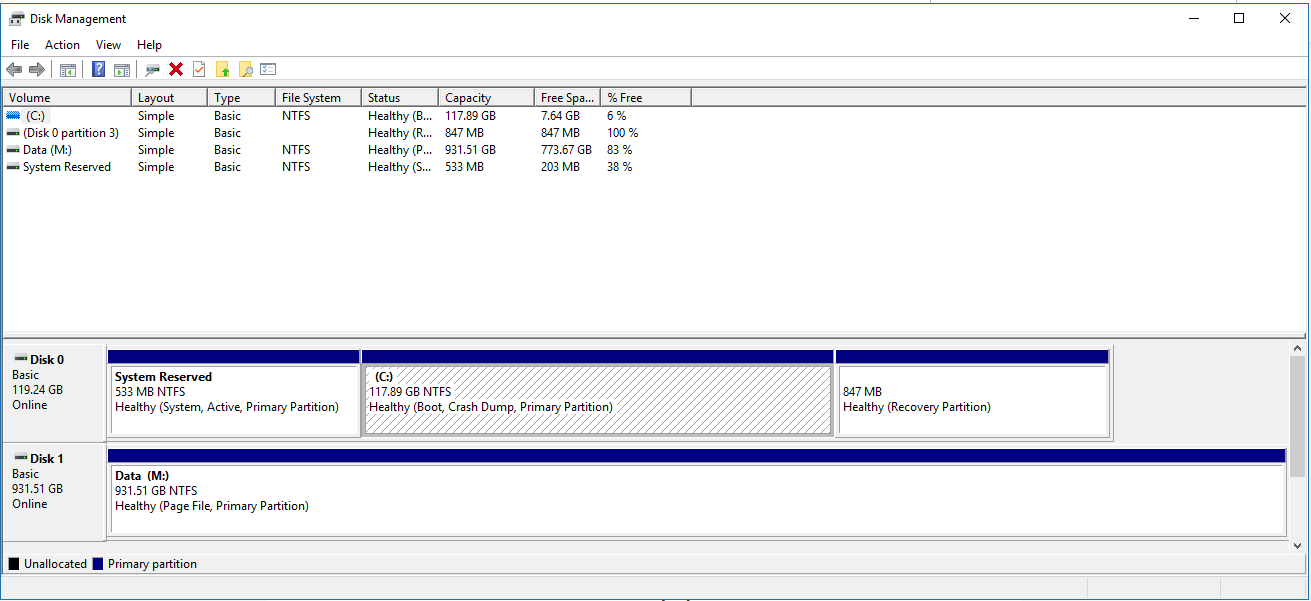
Verify that all required drive letters for the VM are correctly assigned in Disk Management.
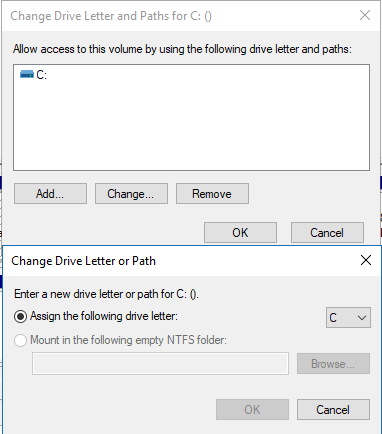
You can change the assigned drive letter of any disk shown by right-clicking the drive's entry and selecting Change Drive Letter and Paths.
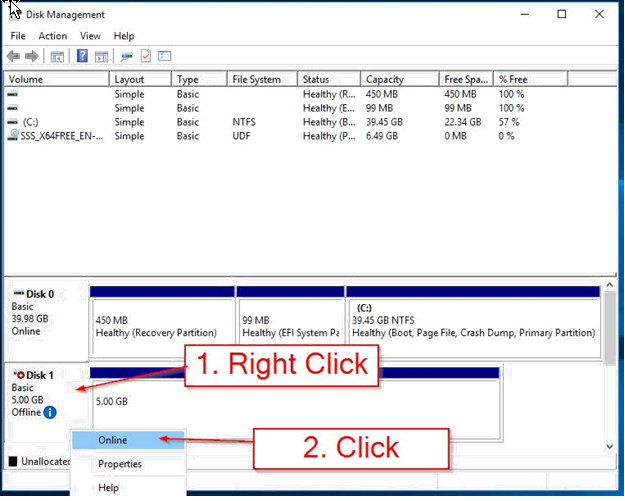
For each offline disk, mark it online. This step is especially important for servers where the AD database lives on a separate drive from the OS.
Make sure that the virtual machine time is close to the snapshot time you're booting from. Once booted normally, the time can be changed back to the present.
Old log files in C:\windows\ntds\ can sometimes cause boot issues. You can try renaming all of the .log files to .old and moving them to a different folder in order to retain them if needed. Once they’ve been renamed and moved, try a reboot.
Next Steps
If the VM is still unable to boot after performing the above steps, try the following:
Checking AD Database Integrity Using esentutl
Boot back into DSRM and login as .\Administrator.
In an administrative command prompt run:
esentutl /g c:\Windows\NTDS\ntds.dit
It will warn you about AD logs, but this message can be ignored.
If the database passes integrity checks, something else is causing the system not to boot. Event logs may shed light on the reason for the boot failure.
If integrity checks mark the database corrupt or failed, you can attempt to repair using:
esentutl /p c:\windows\ntds\ntds.dit.
NOTE This is a repair attempt and is potentially damaging to the database. Any other utilities such as chkdsk and sfc scan can be utilized at this point as well at your discretion.
In a recovery scenario; should maintenance tools fail to bring the database online in a healthy state, attempt restoration from earlier recovery points.
Outside of a live recovery; screenshots may be corrected by a new full backup or differential merge.
Attempt differential merge:
- Force a differential merge for the protected system.
- When completed, force a screenshot for the resulting backup.
- If the issue persists, check the production system's filesystems from an administrator-level command prompt with chkdsk /r.
- Repeat Step 1 and Step 2 of this section.
- If the issue persists, proceed to the next section of this article.
Take a new full backup by destroying the live dataset:
- Destroy the live dataset for the protected system.
- Start a backup for the protected system.
- When the backup completes, force a screenshot for the newly-created point and observe the results.
Additional Resources
- Esentutl | Microsoft Docs (external link)
- How to Reset DSRM Password (external link)


