Introduction to Screenshot Verification
Screenshot Verifications are a feature of SIRIS and ALTO devices that utilizes local virtualizations to confirm boot-able backup points. For scheduled backups, a virtualization will be created, without networking, in order to take a screenshot image of the virtualization's display after a set period of time.
This image is then analyzed using AI, to determine if there was any errors with the boot, or if it successfully made it to the login screen. This AI detection process does not store customer's Screenshots and is only used to determine the success or failure of the virtualization's boot and the health of the backup.
Periodically, we will store a small, random sample of various customer’s Screenshots in order to refine detection and categorization accuracy, including the training and evaluation of an internal Kaseya AI model specific to this functionality. These sampled Screenshots will each be stored for no more than eighteen months.
For more information about virtualizations on Datto appliances, and how they relate to screenshot verification, see the How Virtualizations Work article.
Environment 
- Datto SIRIS
- Datto ALTO
Description
Screenshot Verification confirms that your Datto device's backups are healthy and working by leveraging AI detection. Screenshot Verification can be configured on an agent basis in the Configure Agent Settings page of the Remote Web. Here, options like additional wait time before the screenshot is taken and schedule may be configured.
NOTE Screenshot verification confirms the ability of a virtualization to boot the operating system of the protected system. It does not test the viability of non-boot volumes. You can use Local Verification to check non-boot volumes.
Datto devices on IRIS 4.0 or newer will automatically initiate a differential merge backup after five failed screenshot attempts as long as a successful screenshot has been completed for the asset within the last month. A differential merge backup may resolve some errors that cause screenshots to fail.

Screenshot Verification uses machine learning to provide the success or fail messaging regarding the screenshots. AI based detection provides more information on the screenshot shown as well as reducing the number of false positive or false negative screenshot verifications, compared to legacy verification methods.
To disable or re-enable AI based verification, navigate to the Device Settings of the Remote Web.
Local alerts are available to notify a user when a screenshot has failed, completed successfully, or has not completed in a set period of time. For more information on creating and managing the alerts, refer to Configuring agent alerts on a Datto Appliance.
Forcing screenshot verification can be useful for testing the integrity of a recovery point. You can queue multiple screenshots at once, but only one screenshot verification process may run at a time.
Screenshot verification may not execute immediately if other processes are running. Forced screenshot verifications for any backup point with an active local virtualization will not run until you remove the virtualization. If screenshot verification will not run for a snapshot, and you have verified that there are no local virtualizations active, contact Datto Technical Support for assistance.
The selected system must have completed at least one backup, and the backup must exist on the local Datto appliance, for screenshot verification options to become available. Screenshot verification is not available for Datto NAS or systems protected by the Datto Mac Agent.
Log in to the Remote Web.
Select the Protect tab.
Under the desired agent, select Manage Recovery Points.
If a screenshot does not exist for a backup point, clicking the 'empty' icon (label 1) will queue the point for verification testing. To re-run verification for a point, click the menu button (label 2), and click Re-Run Verification.
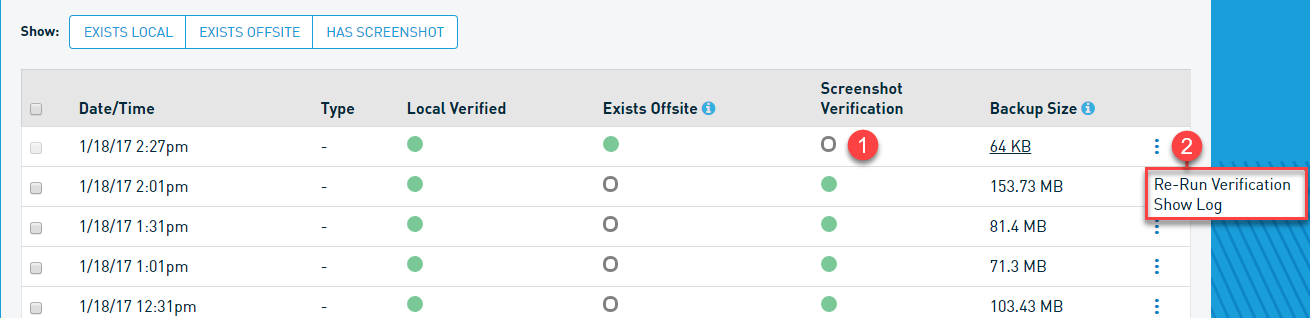
If a screenshot is underway, an estimated time to completion will replace the icon. The report will automatically refresh when the verification test has completed.
Once the screenshot verification completes, the 'empty' icon will be replaced with an icon reporting the screenshot's status. See the Manage Recovery Points article for further information about verification testing, including an explanation of success and failure icons.
If the screenshot verification process does not detect a successful boot, it will simply capture an image of the screen after a preset amount of time.
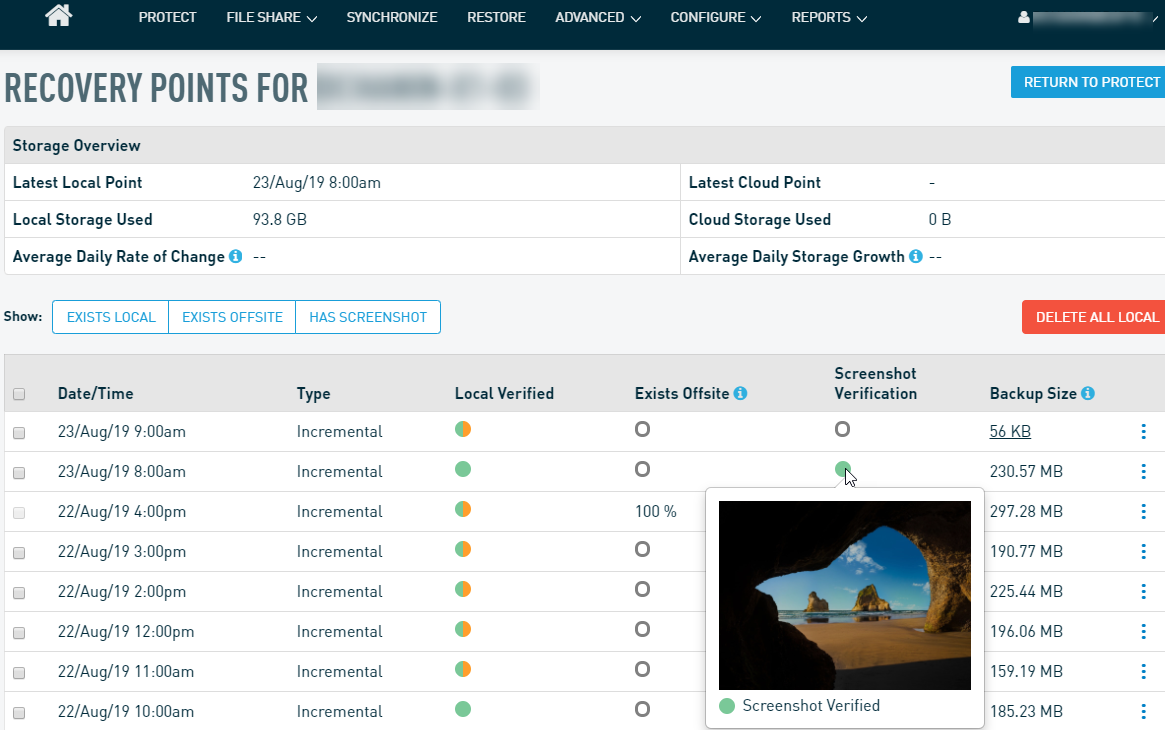
You can view the results of a screenshot verification by logging into the Datto GUI, clicking the PROTECT tab, and then clicking Manage Recovery Points. Place your cursor over the circle under the Screenshot Verification column for the date and time you wish to view.
When diagnosing a failed screenshot, the captured image may not display the correct error or state that caused the failure. To check, create a virtual machine manually to observe its behavior.
To create a virtual machine manually, follow the steps below.
NOTE Local virtualizations are not available on ALTO devices.
Log in to the Remote Web.
Click Restore.
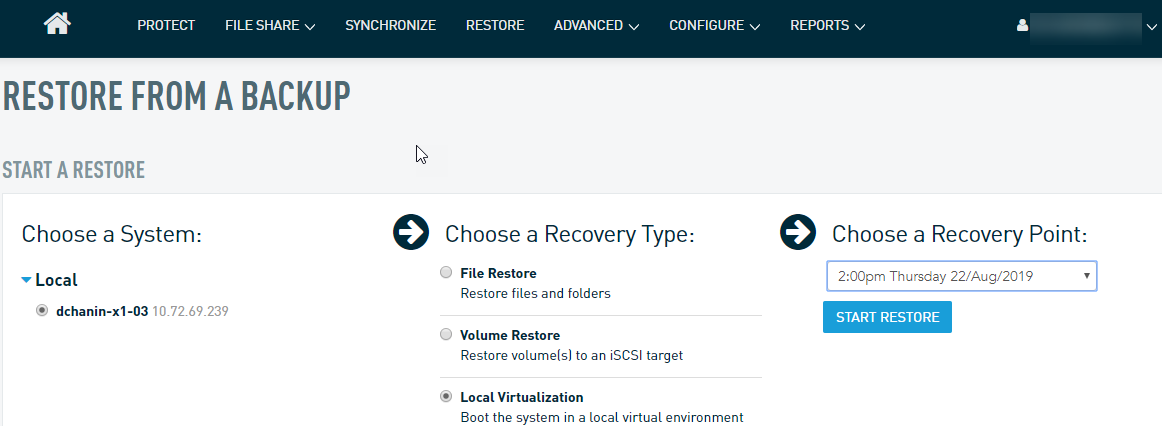
Select the protected machine to be virtualized by clicking the corresponding button under Start aRestore.
Under Choose Recovery Type, select Local Virtualization.
Under Choose a Recovery Point, select the same point in time for which the screenshot failed.
After confirming the information is correct, click START RESTORE.
On the Local Virtualization screen, you can set the following:
- Number of CPU cores
- The amount of RAM
- Storage Controller
- Network Options
- Video Controller
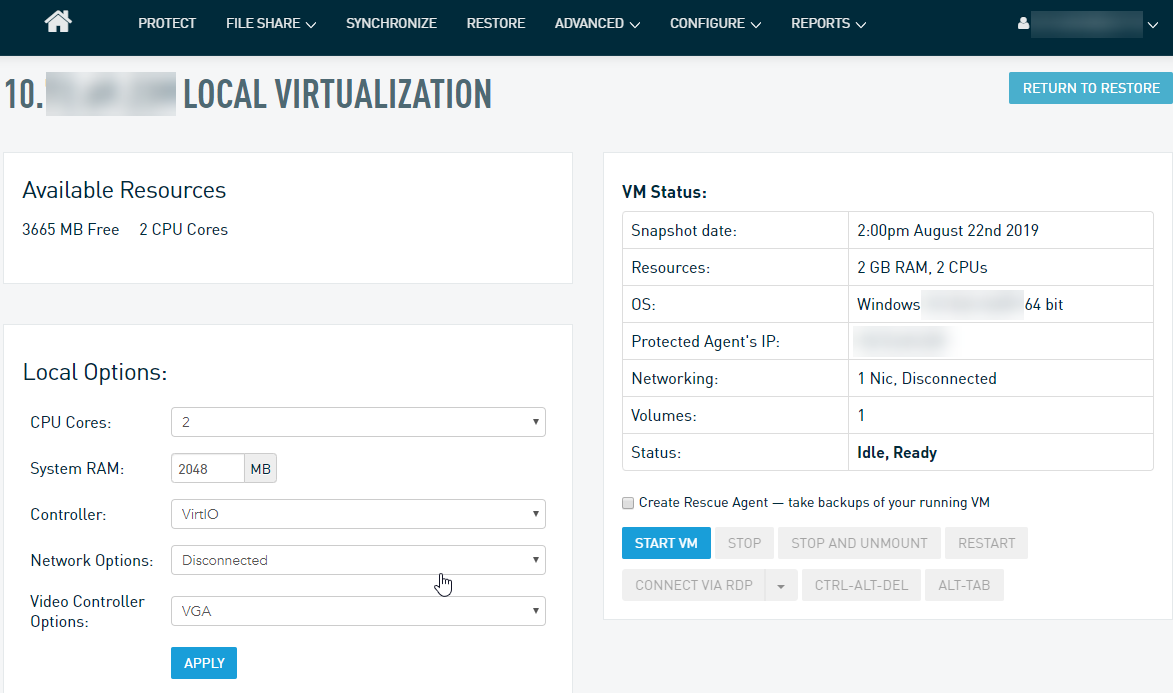
To replicate the exact behavior of the virtual machine during screenshotting, select the same amount of virtualization resources and the same storage controller used by the screenshot verification process. By default, screenshots for 32-bit virtual machines use 1 CPU core and 2 GB (2048MB) of RAM, and screenshots for 64-bit systems use 2 CPU cores and 3 GB (3072MB) of RAM. The screenshot verification process uses whichever storage controller you set in the Configure Agent Settings screen for the desired agent.
For testing purposes, set Network Options to Disconnected and uncheck the box labeled Create Rescue Agent. For more information about the different options, check out Remote Web - Local Virtualization - Local Options.
After confirming the resources and storage controller, start the virtual machine: by clicking Start VM.
Observe its behavior by downloading the automatically-generated RDP link.
NOTE RDP access to virtualizations requires the connecting workstation to be running Windows Server 2008 SP3 or newer.
After testing, stop and unmount the virtual machine through the Restore menu. Automated screenshots will not occur if a virtual machine is already mounted.
Due to a limitation of the libvirt virtualization API, if an agent-based protected system's hostname is 50 characters in length or more, or an agentless protected system's name is 42 characters or more, screenshot verification will fail.
Screenshot verification does not attach a NIC to the virtual machine when testing the boot-ability of the image. If the protected machine requires a NIC to boot, then it will fail the screenshot verification process.


