Restoring Thin-Provisioned VHD Exports to Microsoft Hyper-V
This article describes the process for attaching a VHD export to a Windows host as a mounted volume and exporting its data to a thin-provisioned Microsoft Hyper-V virtual drive.
To restore a VHD to Microsoft Hyper-V with thick provisioning, see Restoring Thick-Provisioned VHD Exports to Hyper-V.
Environment 
- Datto SIRIS
- Datto ALTO
- Microsoft Hyper-V
- Windows Server 2008
- Windows Server 2008 R2
- Windows Server 2012
- Windows Server 2012 R2
- Windows Server 2016
- Windows Server 2019
- Windows Server 2022
- Windows Server 2025
Description
This article provides two methods for restoring thin-provisioned VHD exports. The Alternate method listed second is not compatible with Microsoft Windows 2019 & 2022, but we have included it as an alternative that you can use with other Windows versions if desired.
During this process, you will mount a restore, create a new, dynamically-allocated virtual volume in Hyper-V, and then copy the contents of the exported VHD to the new volume.
This article uses screenshots that may vary depending on the platforms and versions being used. Follow the steps outlined below.
Mount an image export on your Datto device by following the steps in the Exporting to a Network Share section of the Export Image article. Make a note of the CIFS/Samba VHD Share path your appliance provides once the restore is mounted.
Launch Hyper-V Manager from Start > Administrative Tools > Hyper-V Manager.
From Hyper-V Manager, click Action > New > Hard Disk.
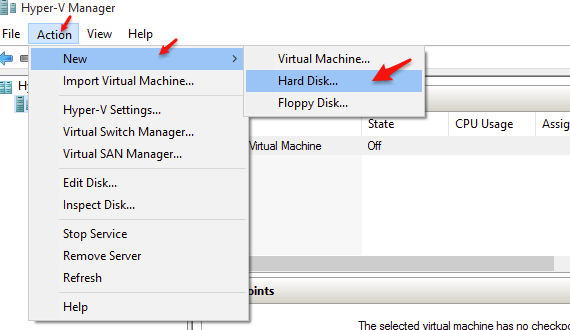
If you see a Before You Begin dialog, click Next.
Select the destination disk format and then click Next.
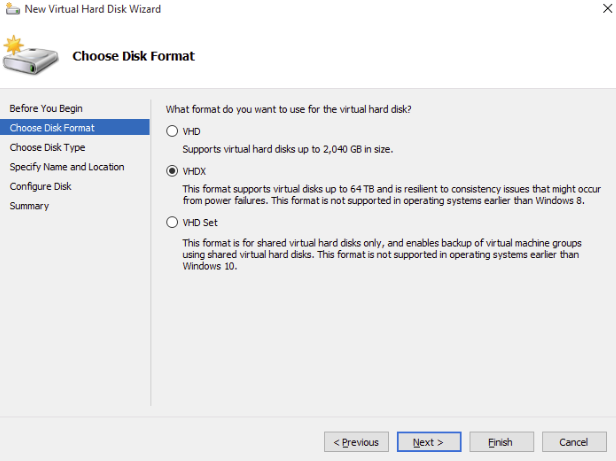
If you are unsure whether you should create a VHD or VHDX Image Export, refer to this Microsoft article(external link) for OS compatibility.
Choose the destination Disk Type, and then click Next.
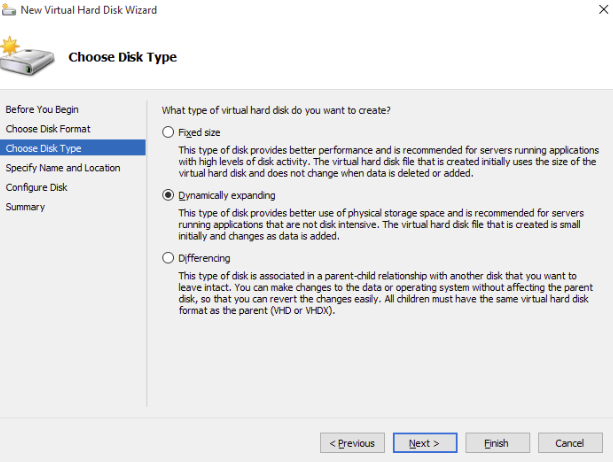
Specify a name for the virtual disk and the location to save it to, and then click Next.

Select the disk or disks to copy by clicking Copy the contents of the specified virtual hard disk and browsing to the CIFS/Samba VHD Share path your appliance provided in step 1, then select the image file. Repeat these steps for all volumes that you need to restore.
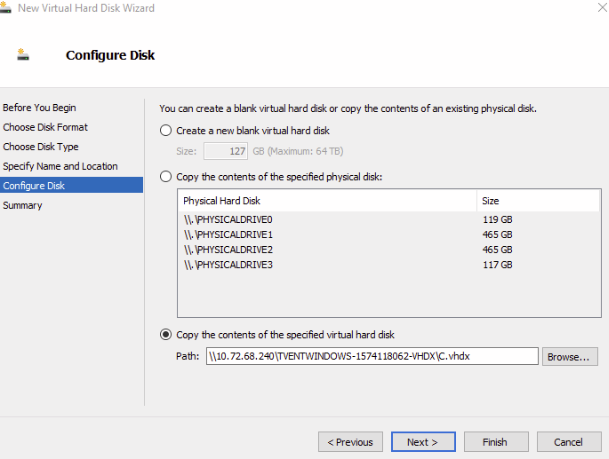
NOTE If you recieve an error when attempting to access the share path, it may be due to Windows security policy settings for SMB. You may need to adjust group policy settings. See Guest access in SMB2 and SMB3 disabled by default in Windows (external link)
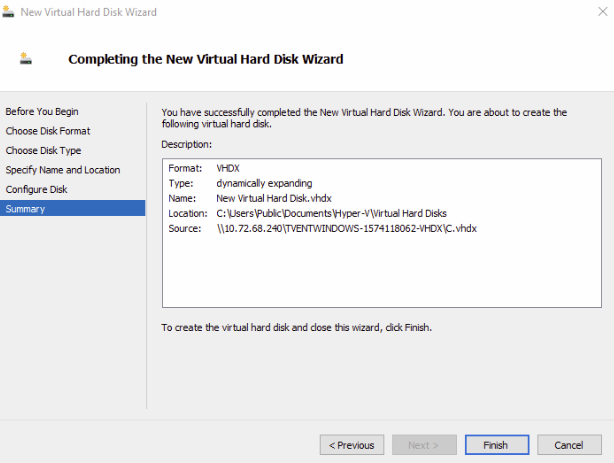
Review the summary to ensure that the virtual hard disk is configured correctly. When you are ready to proceed with disk creation, click Finish.
A progress bar showing the status of the transfer will appear.
Alternate method 
NOTE This alternate method will not work on Server 2019 & 2022 hosts and could result in Incorrect function (0xc8007001) errors on Windows 2019 & 2022 systems.
 Part 1: Attaching the Volume as a Logical Drive
Before proceeding further, mount an image export on your Datto device by following the steps in the Exporting to a Network Share section of the Export Image article. Make a note of the CIFS/Samba VHD Share path your appliance provides once the restore is mounted.
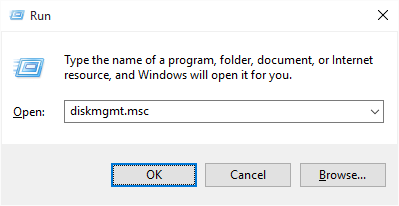
Launch Disk Management on your Hyper-V-enabled Windows machine.
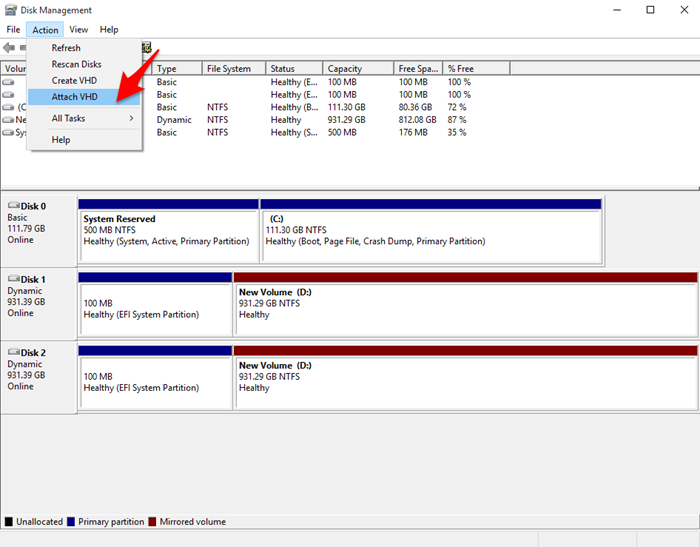
Click Action > Attach VHD.
At the Attach Virtual Hard Disk prompt, select Browse.
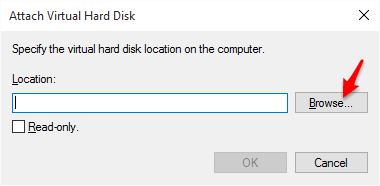
In the Location field, enter the CIFS/Samba VHD Share you obtained in Step 1. Then, click Open.
When the share opens, select the hard disk image, and click Open.
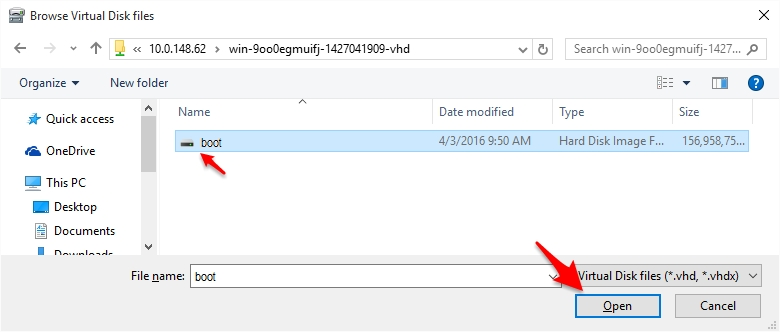
If boot.vhd and C.vhd are both present, select boot.vhd as the first drive, and attach C.vhd as the secondary drive. If only C.vhd is present, use C.vhd as the first drive.
NOTE For Linux systems, C.vhd will be sda1.vhd.
There are two reasons to add a boot and a C volume:
- For devices where UEFI is unsupported, adding a boot and C:\ volume is necessary to make GPT-formatted OS volumes readable.
- Adding both volumes fixes virtualization failures for some MBR / BIOS agents. While a production Windows machine can still boot from its System Reserved partition even if its NTFS bootstrap code has corruption, virtualizations do not have this ability unless both the boot and C volumes are present.
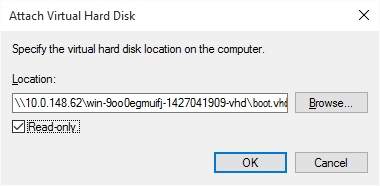
At the Attach Virtual Hard Disk prompt, check the Read-only box, and click OK to mount the image.
The VHD will mount as a volume in Windows.
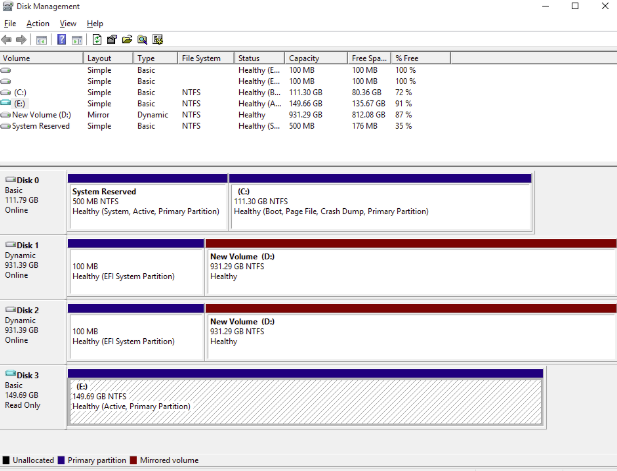
To recover files from the virtual disk with their permissions intact, use Robocopy or Richcopy.
To import the disk image into Hyper-V, see the next section of this article.
Part 2: Importing the Volume into Hyper-V ManagerLaunch Hyper-V Manager from Start > Administrative Tools > Hyper-V Manager.
From Hyper-V Manager, click Action > New Hard Disk.
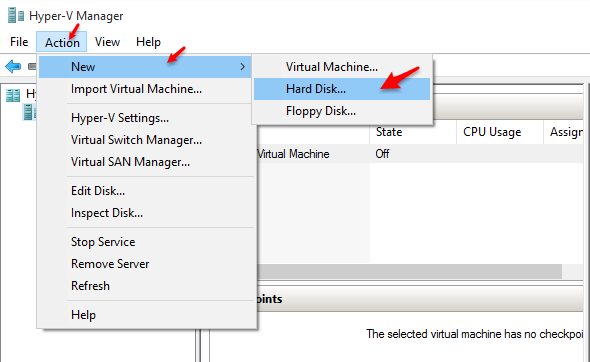
If you see a Before You Begin dialog, click Next.
Select the destination Disk Format, and then click Next.
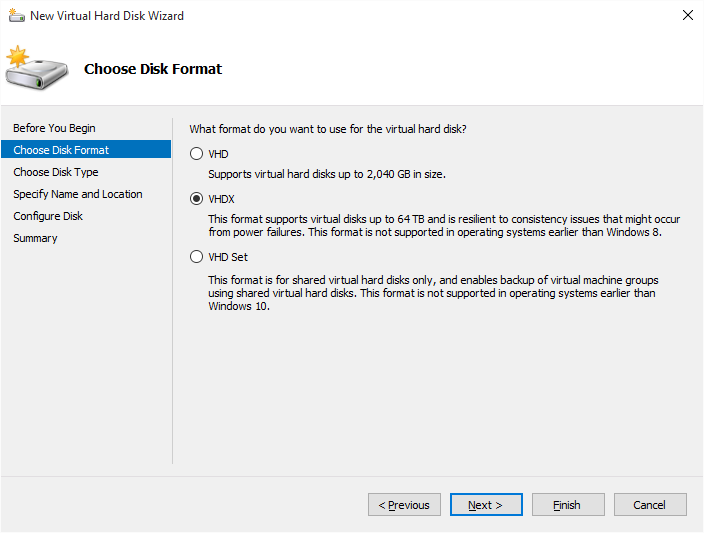
Choose the destination Disk Type, and then click Next.
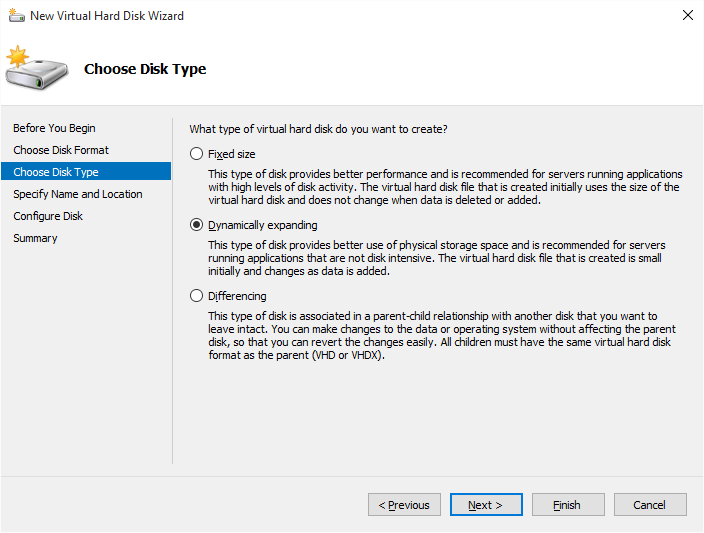
Specify a name for the virtual disk and the location to save it to, and then click Next.
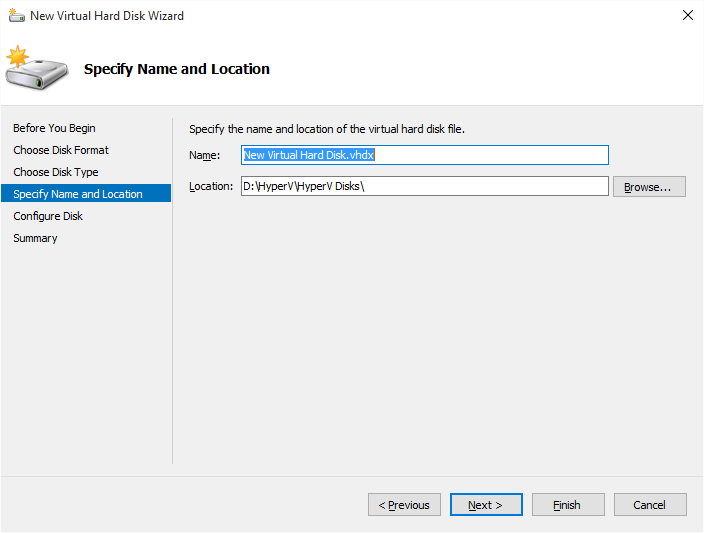
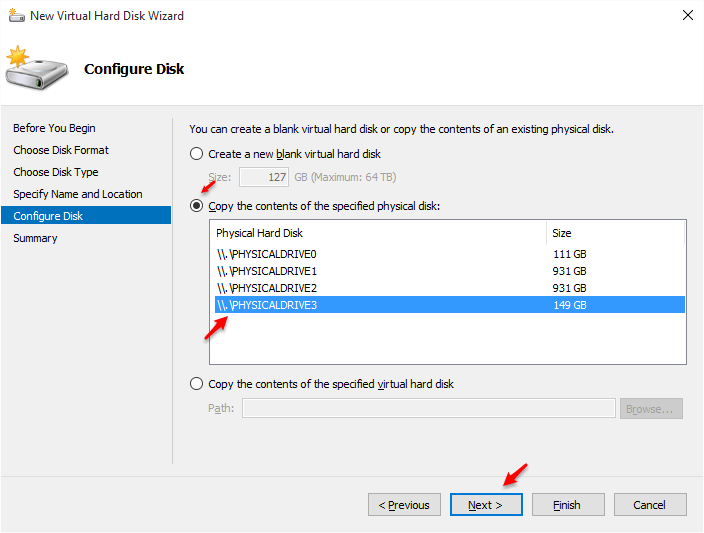
Select the disk or disks to copy by clicking Copy the contents of the specified physical disk and selecting the PHYSICALDRIVE value that is the same disk number as the VHD that is mounted. Then, click Next. Repeat this step for all disks involved in the restoration.

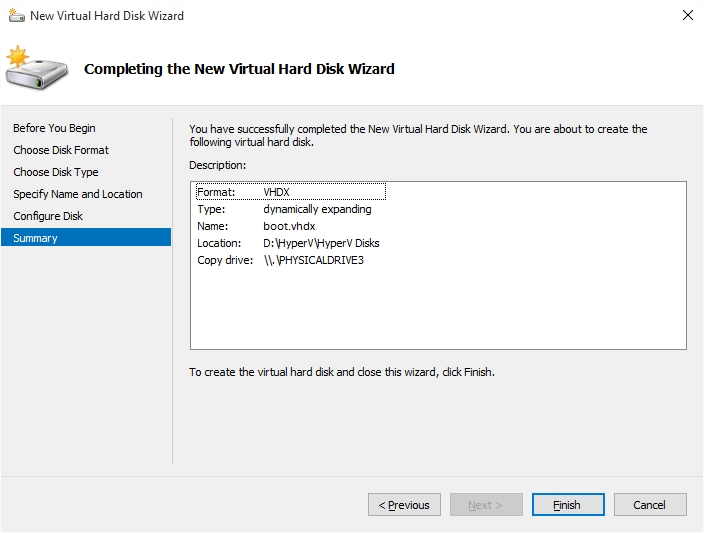
Review the summary to ensure that the virtual hard disk is configured correctly. When you are ready to proceed with disk creation, click Finish.
A progress bar showing the status of the transfer will appear.

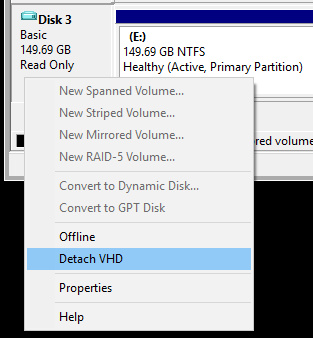
After the transfer has completed, detach the VHD from Disk Management.
Part 3: Finalizing the RestoreFrom Hyper-V Manager, click Action > New > Virtual Machine. When the New Virtual Machine Wizard launches, click Next.
If the Before You Begin page pops up, click Next.
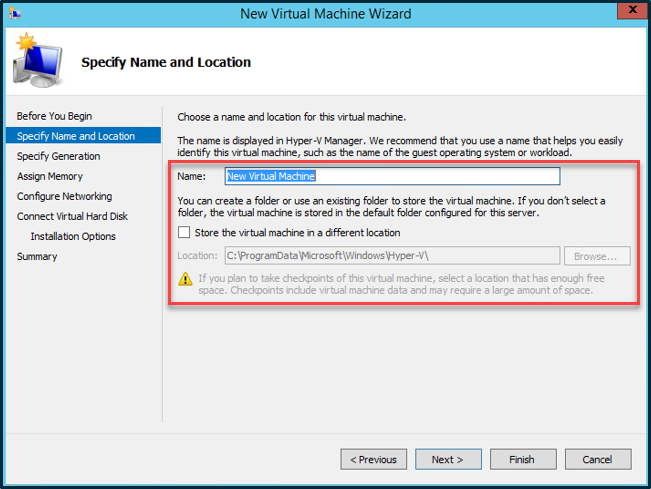
Provide a name and (optionally) a storage location for the virtual machine, and then click Next.
Specify the Generation of the VM. If you are using Hyper-V Manager 2008 or earlier, skip this step. Your Hyper-V Manager environment does not support Generation 2 virtual machines. Generation 1 provides the same virtual hardware to the virtual machine as previous versions of Hyper-V. Any virtual machine over 2 TB must use a Generation 2 template.
Generation 1 VMs:
- Can use VHD and VHDx disk formats
- Only support the MBR boot type
Generation 2 VMs:
- Can only use the VHDx disk format
- Only support UEFI; BIOS is unsupported
Generation 2 provides support for features such as Secure Boot, SCSI boot, and PXE boot using a standard network adapter. Guest operating systems must be running at least Windows Server 2012 or 64-bit versions of Windows 8.
Provide the amount of RAM to allocate the virtual machine. Then, click Next.
Select the NIC to use in the virtual machine. The default value is Not Connected (Hyper-V Manager 2008 or earlier) or None(Hyper-V Manager 2012).
On the Connect Virtual Hard Disk page, select Use an existing virtual hard disk. Provide the path to the datastore where you copied the VHD(x), and then click Next.
NOTE Be sure to attach boot.vhd(x) first.
On the Summary page, confirm all configuration settings are correct and click Finish.
In the Virtual Machines pane, right-click the VM, and then click Settings.
Click the storage controller to which you attached boot.vhd(x). Then, click Hard Drive > Add.
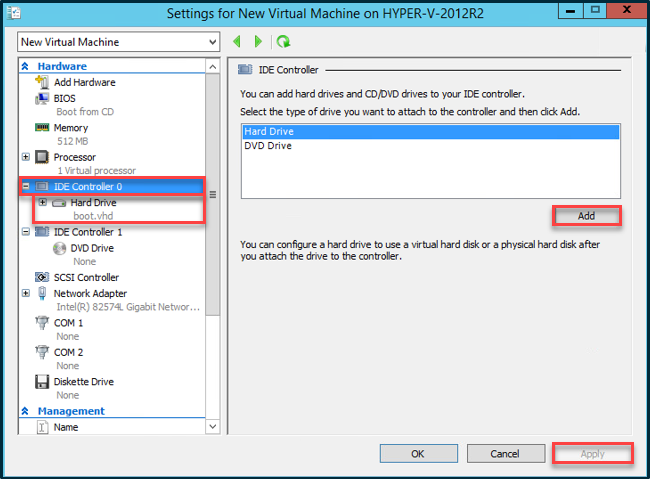
Select Virtual hard disk if it is not already selected. Browse to the location of your C.vhd(x) (or sda1.vhd, on Linux systems), select it, and click Apply. Repeat this step for each additional disk that you need to attach.
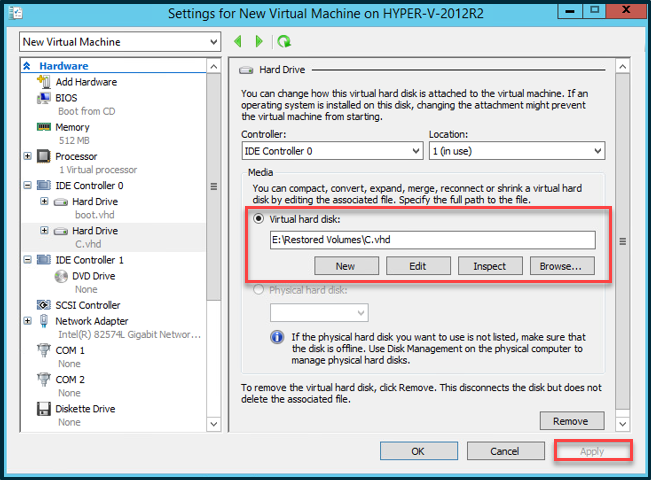
When you finish configuring the virtual machine's settings, click OK, right-click the VM, and click Start.
Troubleshooting
Can not connect to share (system error 1272) File Restores and Image export Samba shares are shared as a public share by default. Depending on your host configuration, guest logins may not be available.
If you receive an error when attempting to access the share path, it may be due to Windows security policy settings for SMB. You may need to adjust group policy settings. See Guest access in SMB2 and SMB3 disabled by default in Windows(external link).
Alternatively, you may recreate the restore after selecting Secure File Restore & Export for the agent in its Configure Agent Settings Menu. This will prompt for a login when connecting to the share. Any local user account for the Datto device will be able to be used.
Logon failure: the user has not been granted the requested logon type at this computer. You may encounter this error message when importing a VM into Hyper-V, as shown below: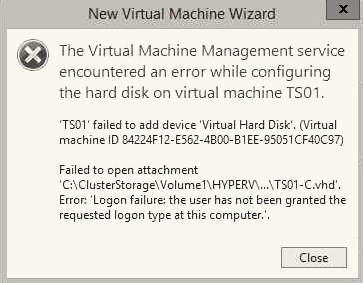
This Windows error can occur if the VM's special identity is missing the Log on as a Service permission on the Hyper-V host (possibly as a result of a failed group policy refresh). To resolve this issue, follow the troubleshooting steps provided by Microsoft in Starting or Live Migrating Hyper-V virtual machines may fail with error 0x80070569 on Windows Server 2012-based computers.
Mouse and networking do not work in the VM after restore This can happen when the virtual machine is unable to reach the Hyper-V Integration Services on the Hyper-V host. To resolve the issue:
Make sure you have enabled Hyper-V Integration Services on the host.
Log into the affected VM and use the keyboard to access the Windows Device ManagerPress the Windows key + R to invoke the Run dialog box, type devmgmt.msc and press Enter.
In the Device Manager window, scroll down to System.
Find the Microsoft Hyper-V Virtual Machine Bus device. There may be a yellow exclamation mark next to it.Press Enter to open the Device Information window, then press Tab until you see an outline on one of the tabs across the top of the window.
Use the keyboard arrows to select the Driver tab.
Press Tab until the Update Driver button is highlighted. Press Space to click the button.
Press Tab until the option for Browse my computer for driver software is highlighted, then press Space to select it.
Press Tab until the Let me pick from a list of device drivers on my computer option is highlighted. Press Space to select it.
The Select the device driver you want to install for this hardware screen will appear. Make sure that the Show compatible hardware checkbox is selected. You should see Microsoft Hyper-V Virtual Machine Bus listed in the Model box.
Press Tab until you have highlighted the Microsoft Hyper-V Virtual Machine Bus driver, and then press Enter.
The software will install. The screen may flicker during mouse and networking driver installation.
After the software installs, the mouse should be functional. Check Hyper-V Manager to confirm that the network adapter is connected. Enter the IP address of the VM if it is set to static.
Check the Services control panel to make sure that the Hyper-V Integration Services are running.


