Export Image
This article describes the Export Image feature of the Datto SIRIS user interface.
Environment 
- Datto SIRIS
- Datto ALTO
Description
The Export Image function allows you to export a recovery point from your Datto appliance as a VHD, VHDX, RAW, VMDK, or VMDK-linked virtual hard disk.
IMPORTANT Do not use the image export function as a server imaging tool. It is meant to restore downed servers. This restore process is not a deployment tool.
Technical Notes 
Image Export for ReFS is currently unsupported. Any ReFS volumes in the selected snapshot get excluded from the restoration. To perform a restore of a ReFS volume, use the Volume Restore feature.
Exported images currently do not include the Microsoft System Reserved (MSR) partition. This may cause issues when creating snapshots in VMware environments. If snapshots are required, perform a Bare Metal Restore (BMR) on the restored virtual machine. This process will also restore the MSR partition, ensuring full system compatibility.
Before restoring a Rescue Agent, you'll need to first gracefully shut down the virtual machine from within the operating system. Then take a snapshot of it from the protect tab of the Datto device to use for your restoration. Failure to take this step will produce dirty images as rescue agent snapshots are non-quiescing.
EFI system partitions are not included in the backup, but are recreated during the restore process. If this partition is non-standard, as in the case with the patches release by Microsoft of systems effected by the vulnerability CVE-2023-24932, the partition would be created standardly. In cases like these, please reach out to Microsoft on re-applying the patch if desired.
Getting Started
To start an Image Export, connect to the Datto Device's Remote Web.
Select Restore from the main menu.
Select the Agent to restore from.
Select the Export Image option and choose a recovery point.
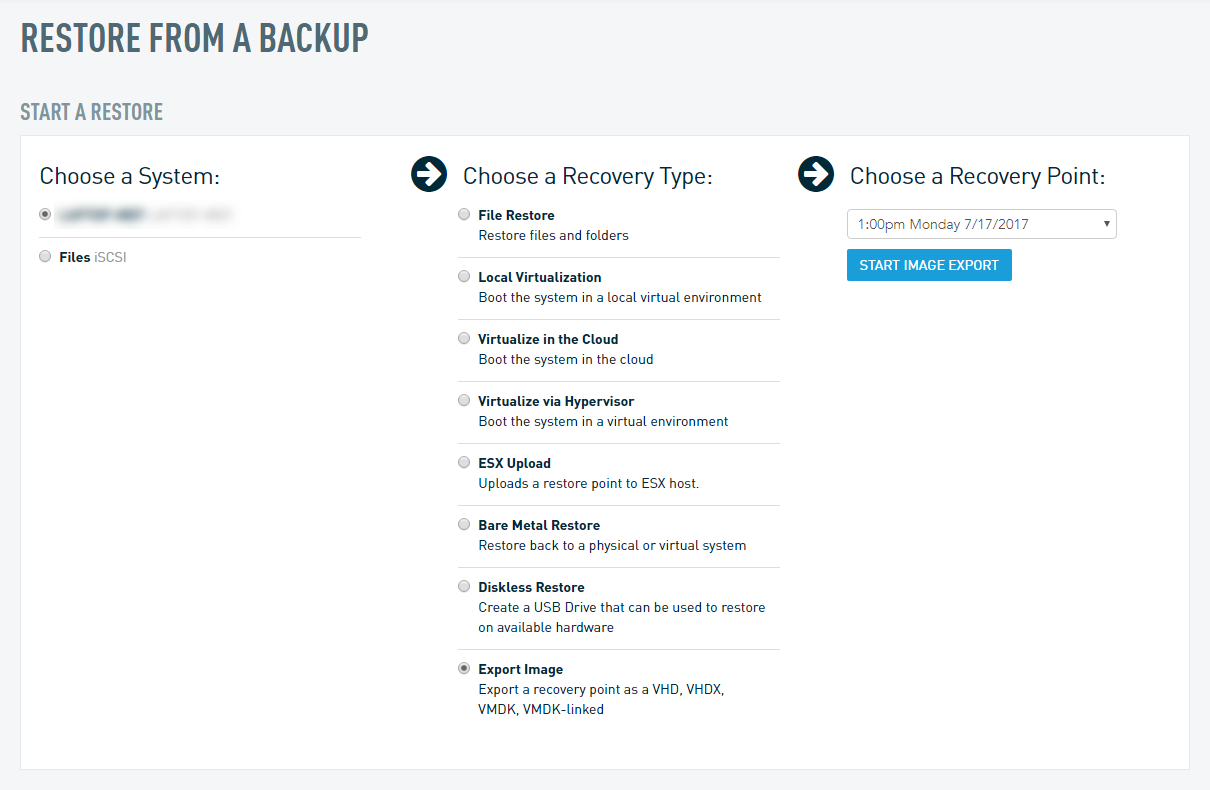
Click Restore.
Select the Destination for the export:

Network Share: lets you export an image via CIFS/Samba or NFS. All image files are always thin-provisioned on the Datto. However, if the tool used to copy the image files to local storage does not accommodate thin provisioning, they will be copied as thick-provisioned. Therefore, make the appropriate storage considerations when copying files to a virtual host or other destination.
IMPORTANT NFS shares containing Image Exports are writable. Do not write production data to the share, as this could lead to data loss when you unmount the image export.
USB (SIRIS only): lets you export an image to an attached USB drive. These are thick-provisioned and can expand to the maximum size of the attached disk.
You can only have one USB drive attached to the device to use this feature, this includes virtual drives
Select the Export format.
VMDK-linked: Raw disk image with VMDK pointer file.
Files produced: A single-drive system results in 4 files; boot.datto, boot.vmdk, C.datto, and C.vmdk. A fifth file, configuration.vmx, will also be present if you are restoring an agentless VMware-based system. When restoring a virtual machine, you must attach boot.vmdk as the first drive in the boot order, and C.vmdk as the second drive.VMDK: Compacted complete VMDK image (supports resizing and other advanced VMFS features).
Disk Space Required: VMDK image exports require approximately 200 MB of free disk space on the destination hypervisor.
Files produced: A single drive system results in 1 file: C.vmdk. A second file, configuration.vmx, will also be present if you are restoring an agentless VMware-based system. The boot volume will always be the first volume of the image export; when restoring a virtual machine, you must attach this as the first drive in the VM configuration.NOTE Currently, exporting VMDK images larger than 2TB is not supported. If you need to export a larger volume, we recommend using the VMDK-linked format instead.
VHD: Converted raw to VHD.
Files produced: A single drive system results in 2 files; boot.vhd and C.vhd.VHDx: Compacted complete VHDx image
Files produced: A single drive system results in 1 file; C.vhdx.RAW: Uncompressed RAW disk image
Files produced: A single drive system results in 1 file; C.raw\ Selecting which VMware file format
 Choose VMDK if you have at least 200 MB of free disk space on the destination hypervisor and if you would like to have the ability to expand the disk size of the virtualization's VMDK files in the future.
Choose VMDK-linked if storage space considerations on your hypervisor are a concern, or if you have to perform a USB transfer of the image export to the datastore on your hypervisor (see the Limitations section of this article for more information), and if you will not need to resize the virtualization's disks in the future.
When restoring a virtual machine from VMDK-linked, you must attach boot.vmdk as the first drive in the boot order, and C.vmdk as the second drive. Adding drives in this order fixes virtualization failures for some MBR and BIOS-based agents, including NTFS bootstrap code corruption, which may typically be ignored by production agents since Windows uses a 'system reserved' partition for booting by default.
IMPORTANT Do not select VMDK-linked if you will need to expand the disk size of the system's VMDK files in the future. The VMDK created during the VMDK-linked export process is a fixed file which references .datto files generated by your Datto appliance. It is not capable of resizing to increase available storage space.
Selecting Hyper-V file format If none of the protected host's volumes exceed 2 TB, you can use either VHD or VHDx.
For volumes larger than 2 TB, you must perform a VHDx image export, as VHD virtual disk files do not support volumes larger than 2 TB. For Hyper-V exports, determine in advance which generation of VM your environment requires. Select VHDX with UEFI Boot for Generation 2 or VHD with BIOS boot for Generation 1. For more information on OS compatibility, refer to this Microsoft article (external link).
Select the Boot Type you would like the image export's boot sector to reflect. The available options are Auto Detect, UEFI, or BIOS. Datto only recommends using Auto Detect if the boot sector format of the production machine is not known.
See the Technical Considerations section of this article for additional information about these options.
After configuring the restore, click Export.
Exporting to a Network Share When exporting to a network share, your Datto appliance will create a shared folder on your network which matches the hostname or IP address associated with the restore. You can access the exported image via the CIFS/Samba path or the NFS path your Datto appliance displays once the export has been created and is available.
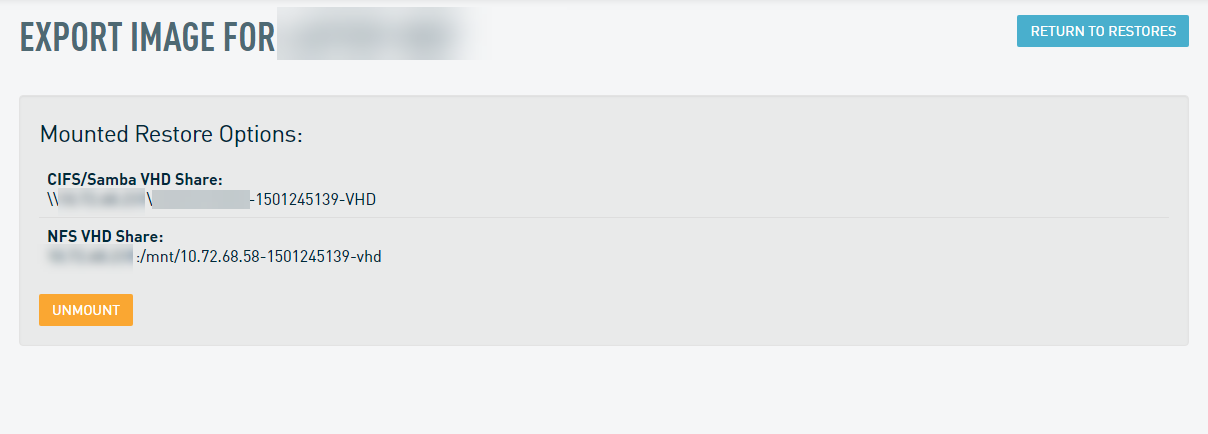
When you finish with the restore, be sure to unmount and remove it to preserve network resources and allow regular backup and retention activity for the agent to continue on your Datto appliance.
Exporting to a USB Drive Using a USB for an Image Export will erase any data currently stored on the USB device. To overwrite the data on the drive and begin the Image Export, click Start copy.

Multiple images cannot be exported to the same USB device because the process formats the USB drive at the beginning of each export. If you want to save multiple Image Exports on the same USB device, you will need to save each export to a network share, then plug the USB device into a computer on the same network, and copy the images from the network share to the USB device.]
Additional Resources
Restoring to Hyper-V using VHD / VHDx
- Should I Create a Generation 1 Or 2 Virtual Machine in Hyper-V? (external link)
- Restoring Thin-Provisioned VHD Exports To Microsoft Hyper-V
- Restoring Thick-Provisioned VHD Exports To Hyper-V
Restoring to VMware ESXi using VMDK


