Configuring Networking from the Datto Appliance Console
This article explains how to configure a Datto device's networking settings when the appliance GUI is not reachable.
Environment 
- Datto SIRIS
- Datto ALTO
- Datto NAS
Description
During initial setup, Datto appliances must communicate with Datto's remote servers to register. The device will attempt to obtain a dynamic IP address from the network's DHCP server. In environments with no DHCP, you will not be able to locate your device on the network or register it until you configure its networking manually.
You can also use this process to restore network connectivity to a Datto appliance that has stopped communicating due to an IP address change or a network environment change.
After you complete the manual configuration, you will be able to manage your device via the Datto Partner Portal or from device.dattobackup.com on your LAN.
Prerequisites 
This article assumes that you have confirmed that your Datto appliance's networking environment meets the SIRIS, ALTO & DNAS Networking and Bandwidth Requirements. If you have not already done so, review your network configuration, correct any issues found, and attempt to reach the Datto appliance again before proceeding.
Procedure
There are two different methods you can use to configure networking. If you are onsite with the device, you can use the Datto appliance console. If you are not onsite, you can use IPMI if you have configured it.
Select a method to continue:
Datto Appliance Console
- Connect a keyboard, monitor, and mouse to your Datto appliance. You should see a console screen similar to the example shown in Figure 1. If you do not see this screen, reboot the Datto appliance. Once it finishes booting, the console screen should display.
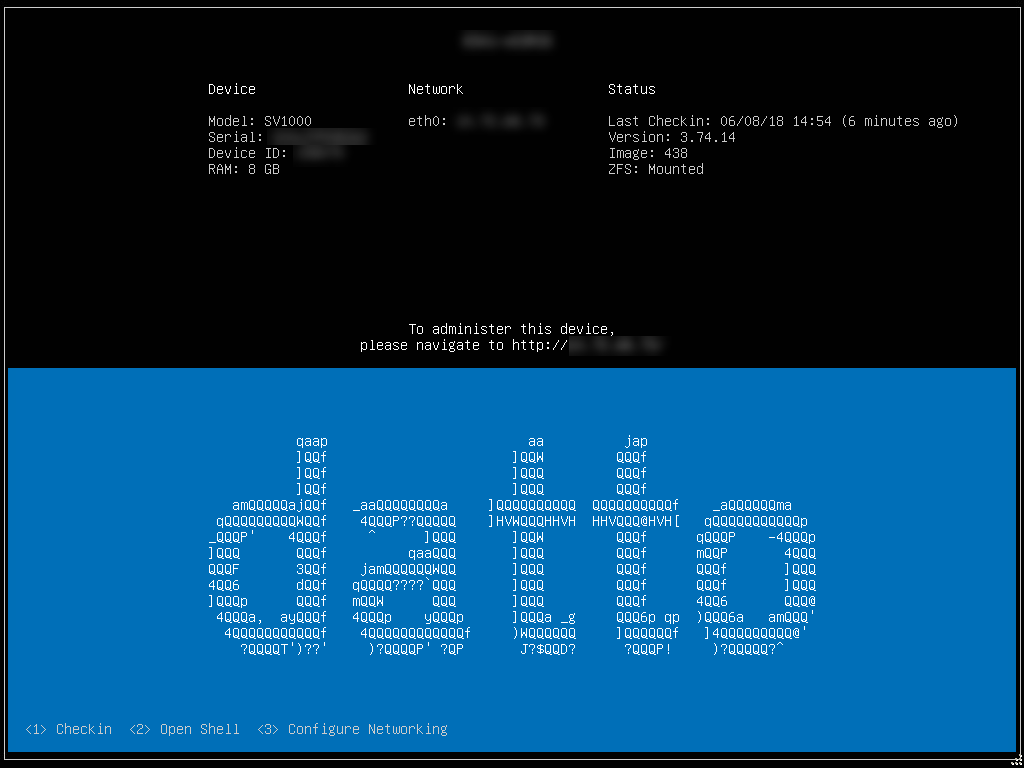
Figure 1: Datto appliance console
- Select Configure Networking by pressing 3 on the keyboard. Then, proceed to the Device Network Configuration section of this article to continue.
IPMI
You can also access the Datto Appliance Console via IPMI if it has been configured on the device.
Prerequisites
For this process to work, the following conditions must have already been met:
- The Datto appliance has a cable in the IPMI port
- IPMI is configured, either locally or through the BIOS and you have logged into IPMI successfully.
- You may need to install Java on the machine that you will be using to access the IPMI-enabled device or add the IPMI address to the Java exceptions list.
Procedure
Once you have met the requirements in the Prerequisites section of this article, and you have accessed the Datto appliance over IPMI, perform the following steps to access the device's Command-Line Interface (CLI):
- Navigate to the Datto console screen. To get to the Datto console screen on SIRIS 3 devices, In the Video Viewer UI, navigate to Macros ? Ctrl-Alt-F? ? Ctrl-Alt-F1, as shown in Figure 1. This step will not be required on SIRIS 4 devices as they will connect directly to the console screen.
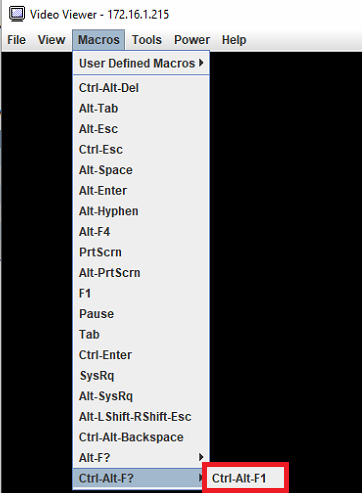
Figure 2: Video Viewer click path
- A window will open, displaying the Datto appliance's console screen, as shown in Figure 3. If you do not see this screen, reboot the Datto appliance. Once it finishes booting, the console screen should display.

Figure 3: Datto appliance console
- Select Configure Networking by pressing 3 on the keyboard. Then, proceed to the next section of this article to continue.
Device Network Configuration
The Device Network Configuration screen contains multiple options.
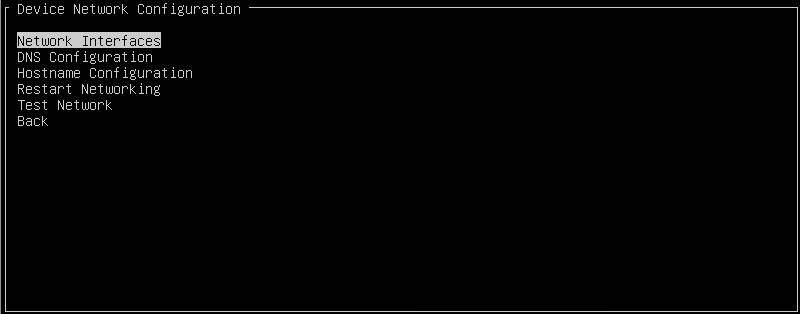
Figure 4: Device Network Configuration
Select a feature to learn more.
Network Interfaces
The Network Interfaces screen allows you to configure all available NICs on your Datto appliance.
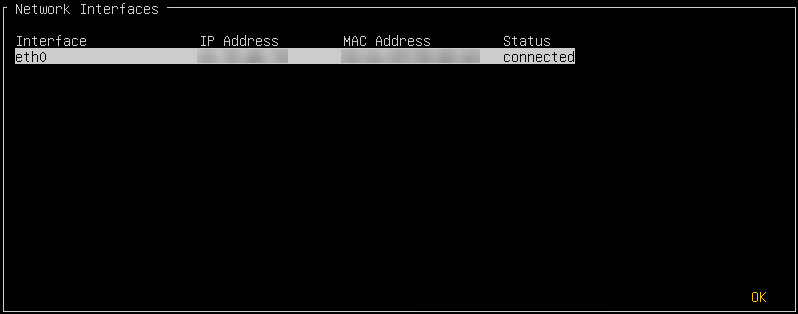
Figure 5: Network Interfaces
To configure an interface, perform the following steps:
- Using the arrows on your keyboard, select the interface you would like to configure and press Enter.
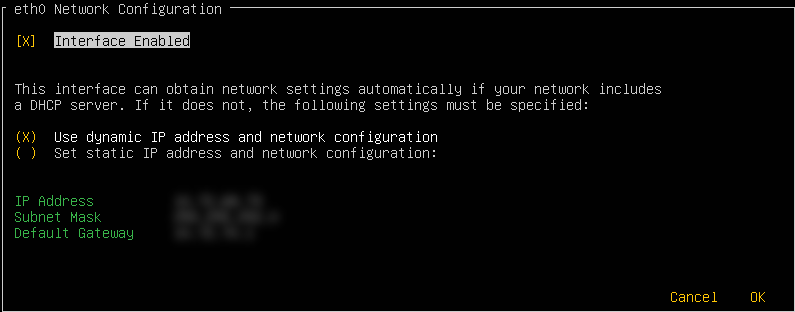
Figure 6: Network Configuration
- The Network Configuration card will display. From this card, you can customize the following options:
- Interface Enabled: Selecting this option and pressing Enter will allow you to enable or disable the selected NIC. Note that if only one NIC exists on the device, or if you have no other NICs enabled, you will not be able to disable the interface.
- Use dynamic IP address and network configuration: Selecting this option and pressing Enter will switch the selected interface to DHCP mode.
- Set static IP address and network configuration: Selecting this option and pressing Enter will allow you to configure a static IP address for the selected interface. You will be prompted to configure an IP Address, Subnet Mask, and a Default Gateway.
When you are finished making changes, select OK to save the configuration. Restart the Datto appliance's networking stack by using the Restart Networking option to apply the new configuration.
DNS Configuration
The DNS Configuration screen allows you to configure the DNS settings for your Datto appliance.
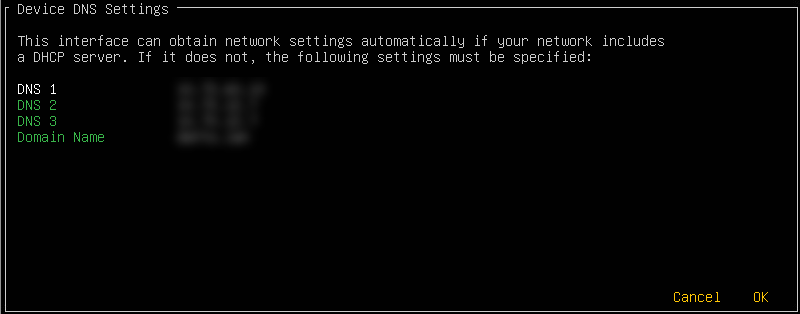
Figure 7: Device DNS Settings
To configure DNS settings, perform the following steps:
- Using the arrows on your keyboard, select the DNS entry you would like to add or edit.
- To add a local DNS resolver server, select the Domain Name field.
- Edit the fields you would like to change.
- When you are finished making changes, select OK to save the configuration. Restart the Datto appliance's networking stack by using the Restart Networking option to apply the new configuration.
Hostname Configuration
The Hostname Configuration screen allows you to configure the hostname of your Datto appliance.
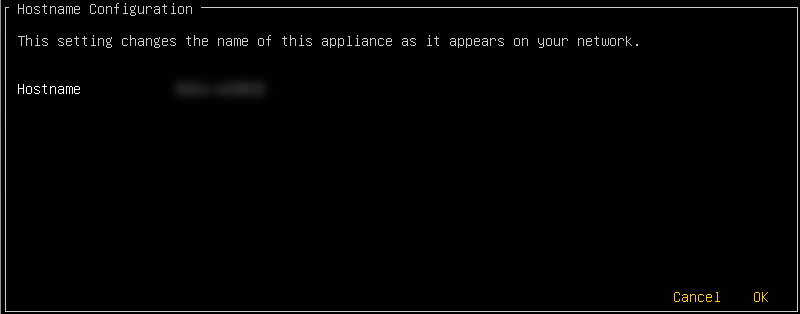
Figure 8: Hostname Configuration
To set or change the hostname of your Datto device, perform the following steps:
- Edit the Hostname field with the desired new hostname.
- Select OK to save the configuration.
NOTE You will need to reboot your Datto appliance for the new hostname to take effect.
Restart Networking
The Restart Networking screen allows you to restart the networking stack on your Datto appliance. Performing this step allows the Datto appliance to detect and apply any changes you have made to its networking configuration (except for a hostname change, which requires a reboot of the Datto appliance to complete).

Figure 9: Restart Networking
To restart networking, select the Restart Networking option from the Device Network Configuration menu. You will see the Restarting Networking confirmation shown in Figure 9. After the networking refresh completes, you will be returned to the Device Network Configuration menu.
Test Network
The Test Network option allows you to test communication between your Datto appliance and Datto's cloud servers to verify successful connectivity to all critical remote nodes.
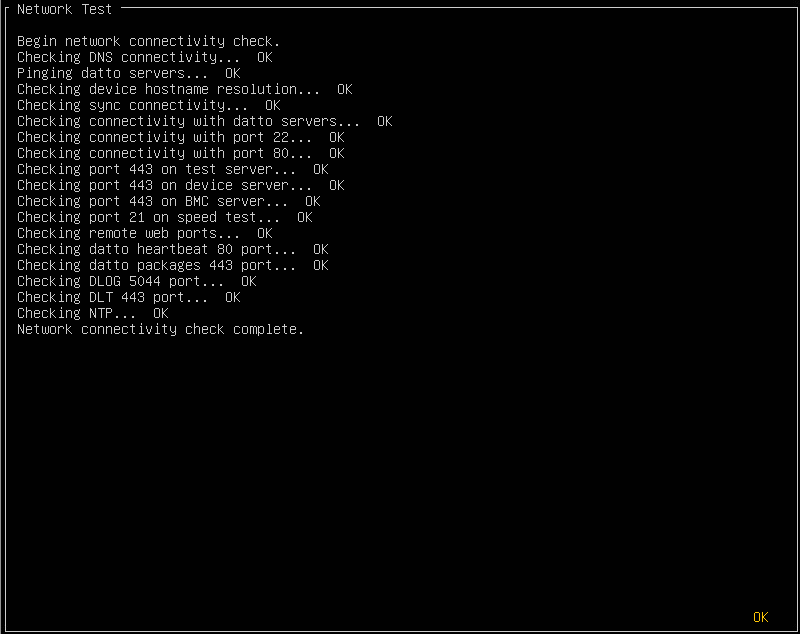
Figure 10: Network Test
- To test networking, select the Test Network option from the Device Network Configuration menu. You will see the Network Test window shown in Figure 10.
- As each stage of the test completes, your device will report whether the check succeeded or failed. Refer to the SIRIS, ALTO and DNAS Networking & Bandwidth Requirements Knowledge Base article if you encounter any failures.
- When the test completes, select OK to return to the Device Network Configuration menu.


