Azure tenant onboarding
Datto Backup for Microsoft Azure protects assets by adding the Azure tenant for protection.
Environment 
- Datto Backup for Microsoft Azure: Azure Files
Description
The onboarding wizard of a new Azure tenant may be stopped and resumed at any time. If interrupted, it will be saved as a draft and may be resumed from the Microsoft Azure – Tenants page.
Adding a new tenant 
-
Log into the UniView portal using your UniView or KaseyaOne credentials.
-
In the left-hand menu, expand Microsoft Azure and select Tenants to open the page.
-
Select + Azure Tenant in the top right of the screen. This will open the Add Tenant wizard.
Sign In
-
Select Sign in to Microsoft Azure. Once the pop-up appears, enter the credentials for your Microsoft Azure account and accept the agreement.
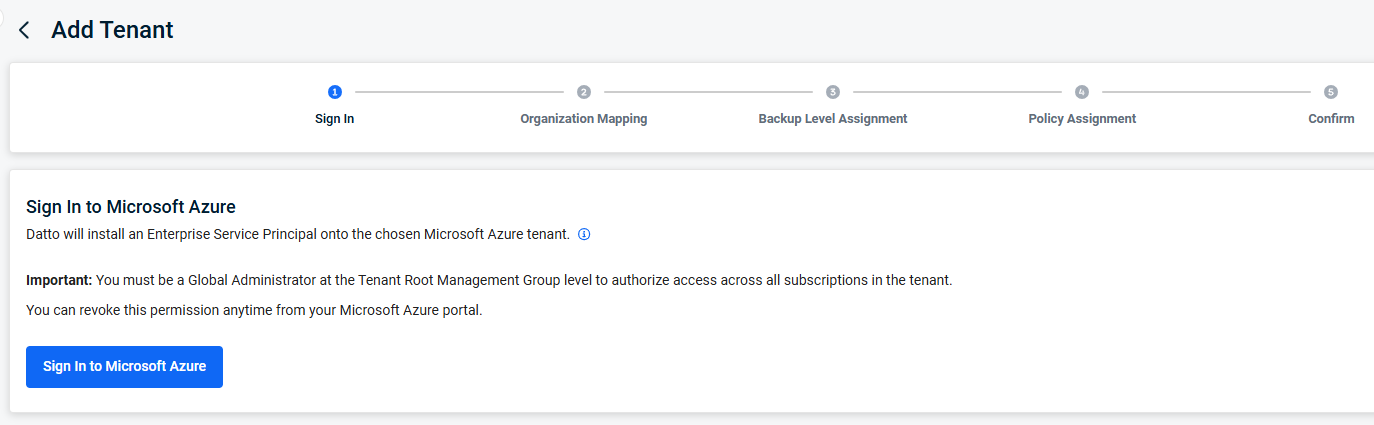
NOTE You must be a Global Administrator at the Tenant Root Management Group level to authorize access, and you will need to input these credentials twice for the different permissions. If there is a permissions or validation issue, there will be a notification detailing it in the Activity Center.
-
Once you are signed in, click Next to continue.
Organization Mapping
-
Select the organization this tenant will be added to from the drop-down menu. If the needed organization is not present, it can be imported through an enabled integration or added as a new organization. For more information on importing an organization using an integration from another product, refer to: Importing an organization .

Import
-
This option will only be available if an integration is enabled in the portal.
-
Select + Import to import the organization from the enabled integration.
New organization
-
This option will only be available if an integration is not enabled in the portal.
-
Select + New to create a new organization.
-
Fill out the Name and Group fields, then click Save.
-
-
Once the organization has been selected, click Next.
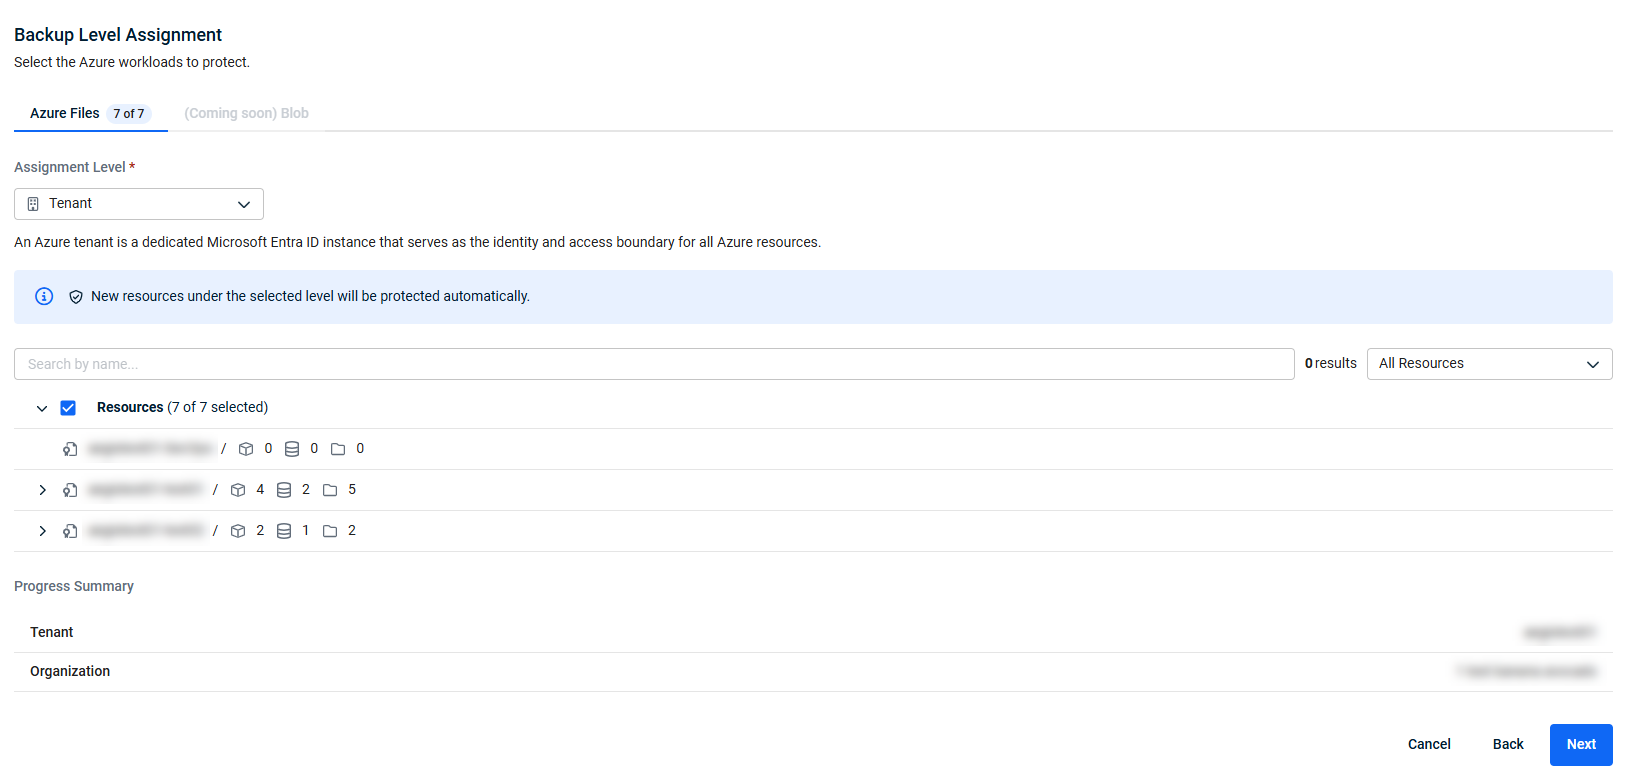
Backup Level Assignment
-
Select the Assignment Level for each of the Azure workloads from the dropdown of the selected tab.
-
Currently the only workload is Azure Files, including the File Shares on the Microsoft Azure tenant.
NOTE Azure File shares that are located in a Storage Account configured with network rules set to deny all public access, will not be able to be backed up.
Assignment Level Description Tenant All resources of the workload in the added Azure tenant will be included for backups. In addition, every newly added resource of this workload will be included automatically. Subscription All resources of the workload in the selected Subscription(s) will be included for backups. In addition, every newly added resource of this workload, in the selected Subscription(s), will be included automatically. Resource Group All resources of the workload in the selected Resource Group(s) will be included for backups. In addition, every newly added resource of this workload, in the selected Resource Group(s), will be included automatically. Storage Account All resources of the workload in the selected Storage Account(s) will be included for backups. In addition, every newly added resource of this workload, in the selected Storage Account(s), will be included automatically. File Share The most granular level, each selected asset will be included for backups. Higher levels may be selected to include multiple resources at once. Any future resources that would need to be protected would need to be included manually. If selecting this level, then at least one resource must be selected for protection to proceed. For more information on Assignment Levels, exclusions, and automatic inclusion of new resources, refer to: Automatic Inclusion .
-
-
After selecting the assignment level and confirming the resources to protect on the Azure tenant, click Next.
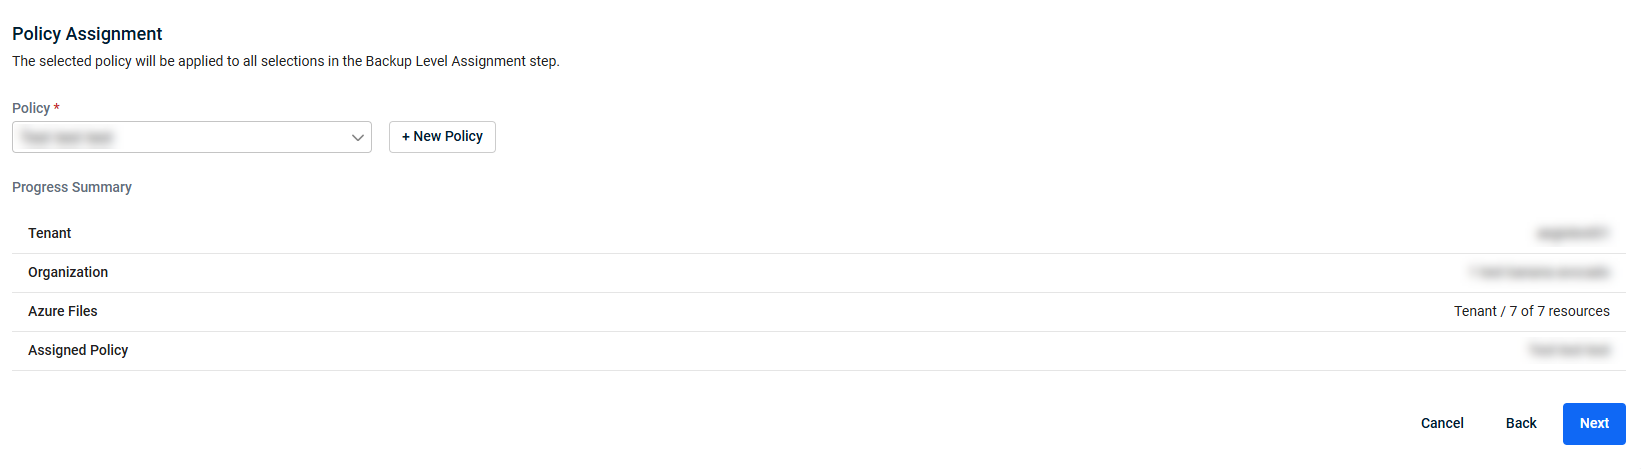
Policy Assignment
-
Select a policy from the drop-down menu to use a previously configured backup policy. If you need to create a new policy, select + New Policy to open the policy creation pane. For more information on creating a policy, refer to: Add a new policy.
-
Click Next, once the policy has been selected.
Confirm
-
Review all the selected options up to this point and confirm the selections. Once ready, select Confirm & Add.
Once confirmed, the draft will be saved, and the onboarding will be triggered. You will receive an Activity Center message once the onboarding process completes. The onboarding process will not take more than 45 minutes.
If at any point the settings need to be adjusted, an Admin account will be required to update the Backup Level Assignment or Policy Assignment, but a Superuser level account will be required to update the Organization Mapping.
Resuming Azure tenant onboarding
If the onboarding was interrupted or paused, it will be listed as a Draft in the Status column. Select the icon in the far right of the row to Resume Onboarding.
If onboarding is resumed after the Backup Level Assignment step and the query of resources is different from what was previously available, it will be resumed from that point, regardless of where it was left off. The selection(s) will need to be made again to confirm the options with the new resources available.
Resume the Azure tenant onboarding process from the step displayed to complete the onboarding.
Updating existing configurations
To adjust the configuration of a previously onboarded tenant, please refer to: Protection modification.


