Bare Metal Restore: Performing the restore
This article describes the process of starting a USB Bare Metal Restore (BMR).
Environment 
- Datto Bare Metal Restore
Description
A Bare Metal Restore is used to restore a backup point to new hardware.
Prerequisites 
This article assumes that you have already:
- reviewed the considerations
- imaged a USB stick with the Datto Utilities
- booted the target machine into the Datto Utilities environment
If you have not already done this, see the Bare Metal Restore (BMR): Getting Started, Imaging a USB Drive with Datto Utilities, and Booting a Target Machine with Datto Utilities articles.
Connecting to your network
The Datto Utility uses DHCP to automatically connect to your network, so no network configuration should be required. However, If network settings need to be adjusted for any reason, click the CONFIGURE NETWORKING button in the top right corner of the page and make any needed changes before proceeding.
Networking Settings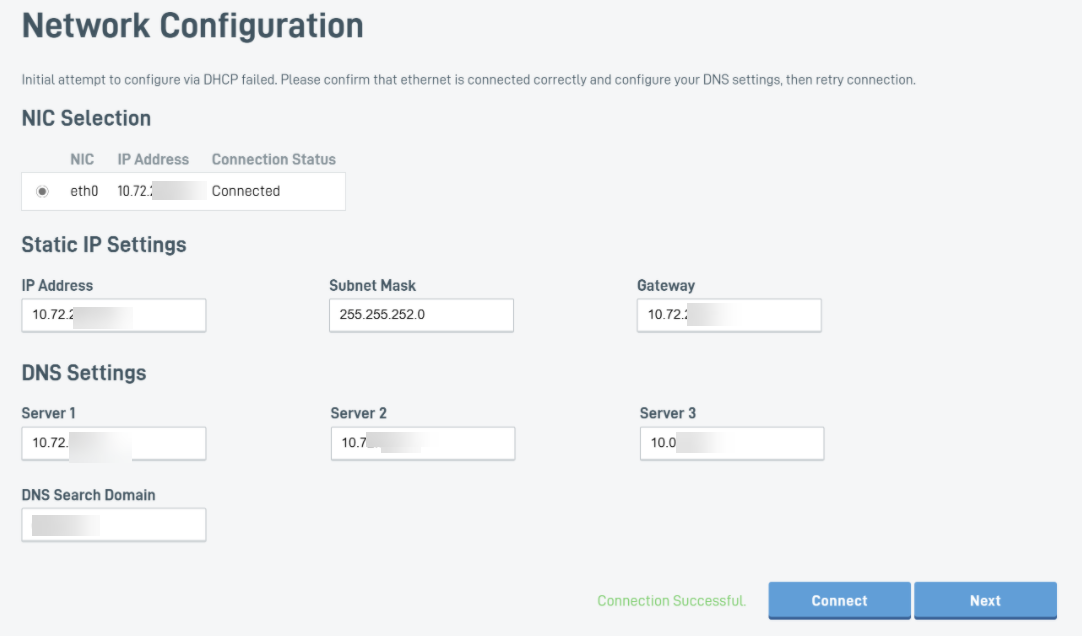
BMR Procedure
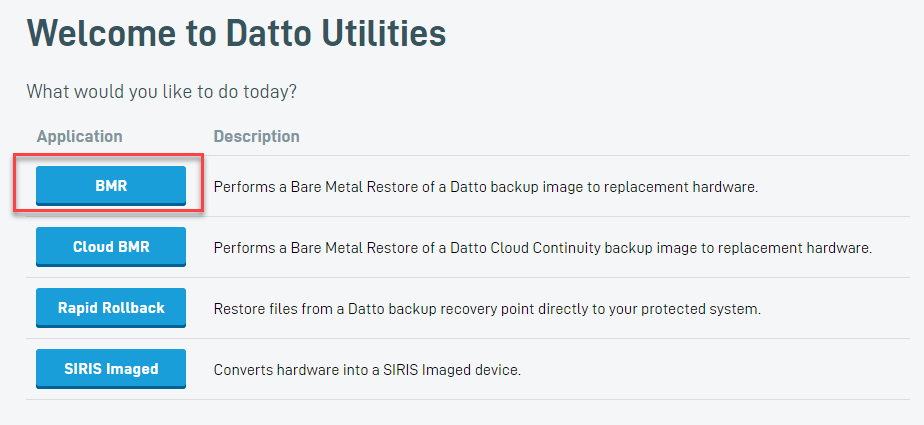
In the Datto Utilities environment, select the BMR option.
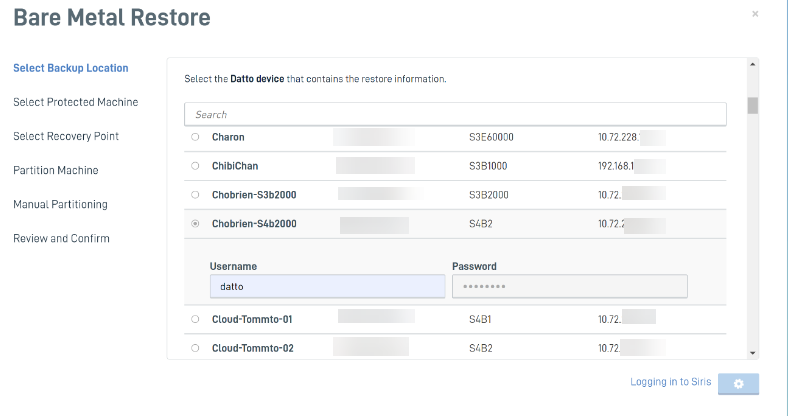
Select the Datto appliance that contains the restore information. Log into the Datto device with the user credentials you created to access its GUI. There will be a message and a gear icon at the bottom right of your screen to notify you of the action being taken.
Click Next.
Select the protected machine to restore.
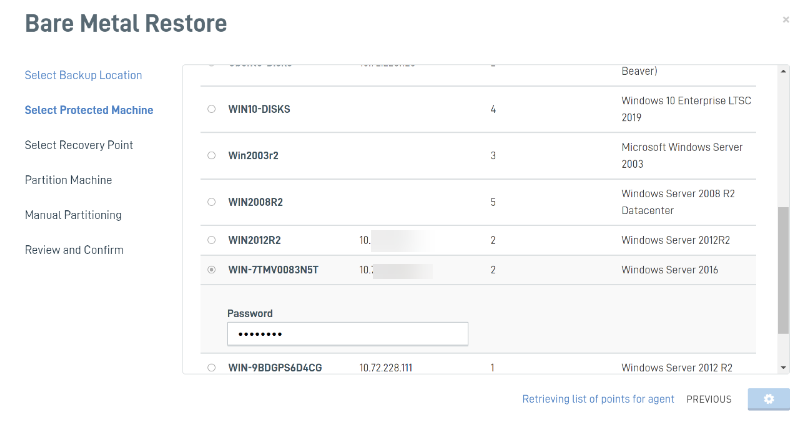
Click Next.
Select a recovery point to restore to the target.
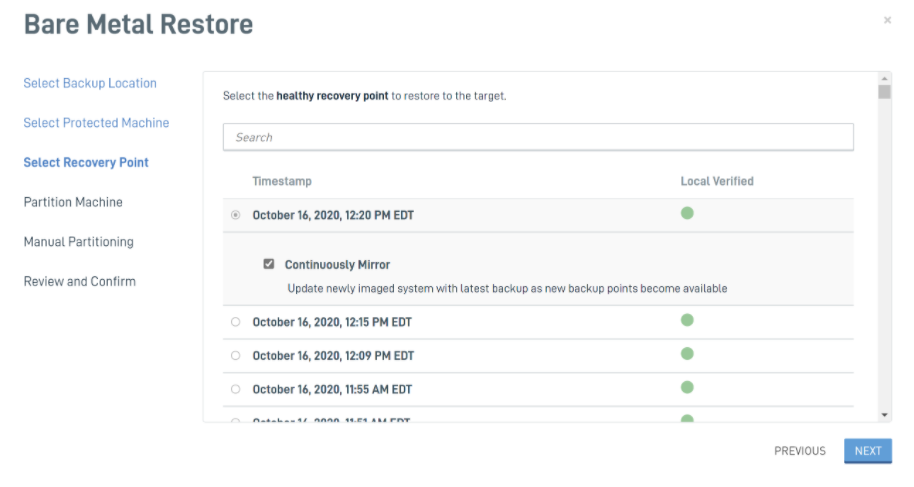
If you created a Rescue Agent for the Disaster Recovery virtualization, you can apply any changes made in the VM during the BMR to the production machine by checking the Continuously Mirror box.
 Important considerations when using Continuous mirroring
- Continuous mirroring requires automatic partitioning to ensure adequate space for incremental changes. You will not be able to select the Manual Partition option if the Continuously Mirror option is enabled unless automatic partitioning fails.
- When performing Bare Metal Restore with mirroring enabled, all disks must be greater than the value in the Recommended Space column for the volume you want to restore. Failure to take this step may cause the boot to fail or mirroring to not succeed.
- With continuous mirroring enabled, Datto recommends using disks on the target that are larger than the source in all cases.
- In the event that the mirroring process is interrupted by an unexpected crash or a reboot of the production machine, it can automatically resume. If the most recent snapshot the mirroring process captured is unusable because of the crash, the process will take another snapshot, and perform a differential merge between the new snapshot and the last good snapshot to reconcile differences between the two points.
- Continuous mirroring does not work with encrypted agents and is unavailable on ALTO and NAS products.
Once you've made your selections, click Next. The wizard will calculate minimum volume sizes, and then display the Partition Machine screen.
Click Automatic Partition (Recommended). The automatic partitioning will attempt to find the 'best fit' where partition sizes will closely match the used space of each of the volumes. Then if there is excess free space on the disk being restored to, it will be divided evenly among the partitions being written to that drive.

Alternatively, if you need to partition the target machine manually, click Manual Partition and proceed to the Bare Metal Restore: Advanced Partitioning article.
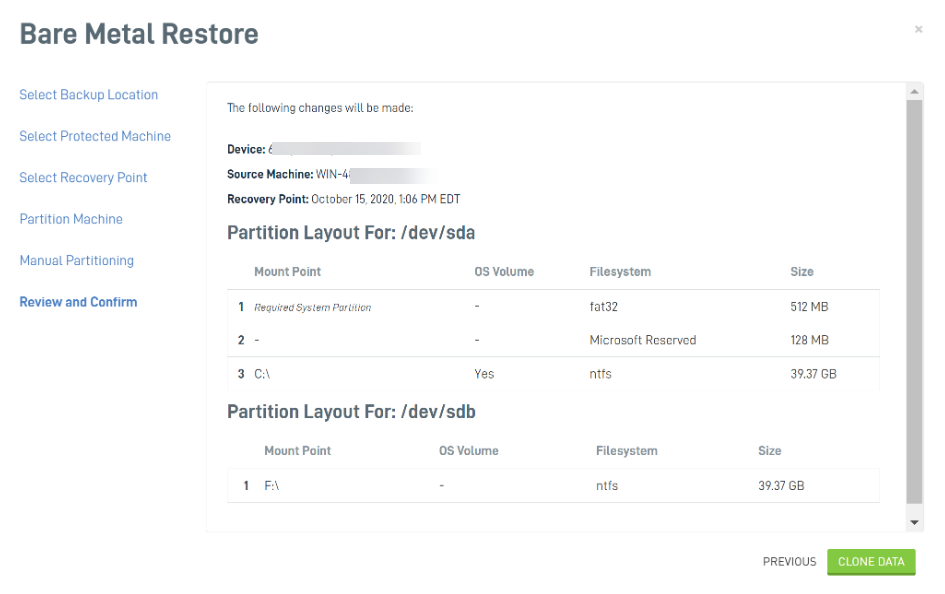
Verify the partition layout. Then, click CLONE DATA.
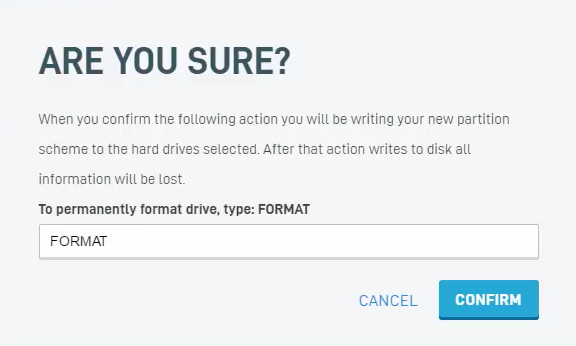
You will be prompted to confirm your selection, as shown. Type FORMAT in the confirmation box, and then click Confirm.
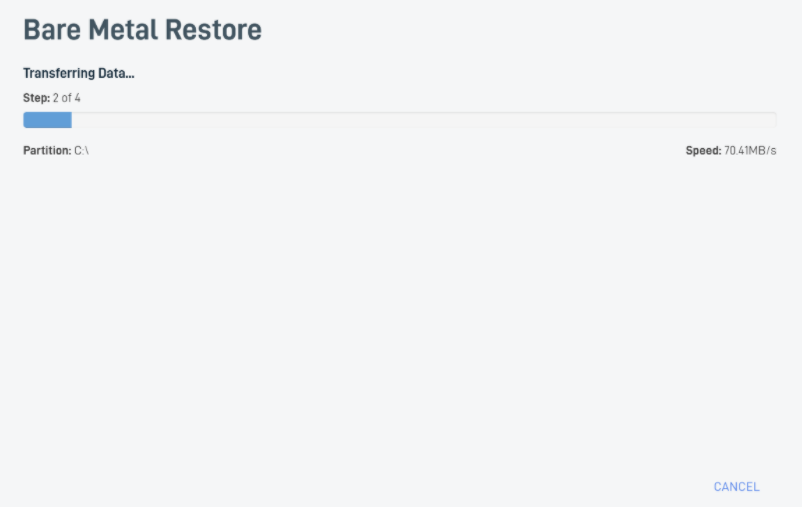
The Bare Metal Restore environment will begin the process of transferring data to your target machine. This process may take some time to complete, depending on how much data you are moving. During this time, the progress will be shown:
When the transfer is complete, you will see the following Restore Status screen.
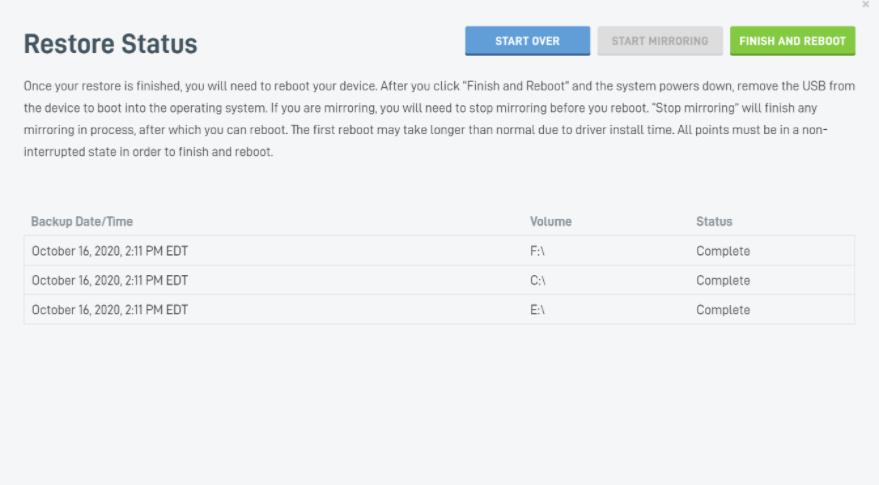
When you are ready to bring the production machine back online, click Stop Mirroring(if mirroring was used), followed by Finish and Reboot.
If you have a Rescue Agent that is currently running, you will see the confirmation prompt:
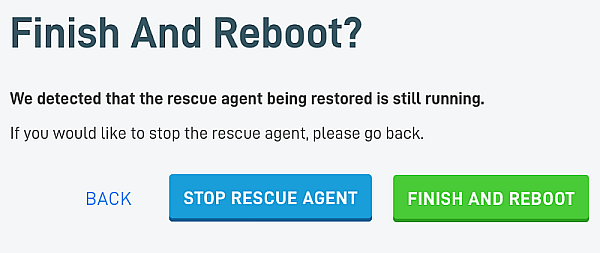
Clicking Stop Rescue Agent will gracefully shut down the running VM, but not archive the Rescue Agent. Clicking Finish and Reboot will reboot the production machine without gracefully shutting down the running VM.
IMPORTANT Datto recommends shutting down Rescue Agents before bringing a production machine back online.
IMPORTANT If you restored from a backup that was taken from a Recovery VM, do not archive the VM until you've verified that the data from all volumes has been properly restored to the target machine.
When you restart the target machine, boot into the BIOS (for MBR) or motherboard firmware (for uEFI).
Set the BIOS or motherboard firmware settings to boot using the disk that contains the OS.
Reboot the machine again. If the machine boots properly, you can now remove the USB stick as the process is complete.
NOTE Do not remove the USB stick until the device has completely rebooted and you have verified the machine is booting properly.
Troubleshooting
The Datto virtualization process intentionally disables some services in order to boot properly. In particular, DELL SupportAssist(external link) related services, which have been found to cause boot problems with virtualizations. If you require these services, you may need to manually re-enable them after your Bare Metal Restore is complete. These services are:
- Dell Data Vault Processor
- Dell Data Vault Collector
- Dell Data Vault Service API
- Dell SupportAssist Agent
If the production machine reboots during the Data Transfer process, you will see an error message similar to the example below.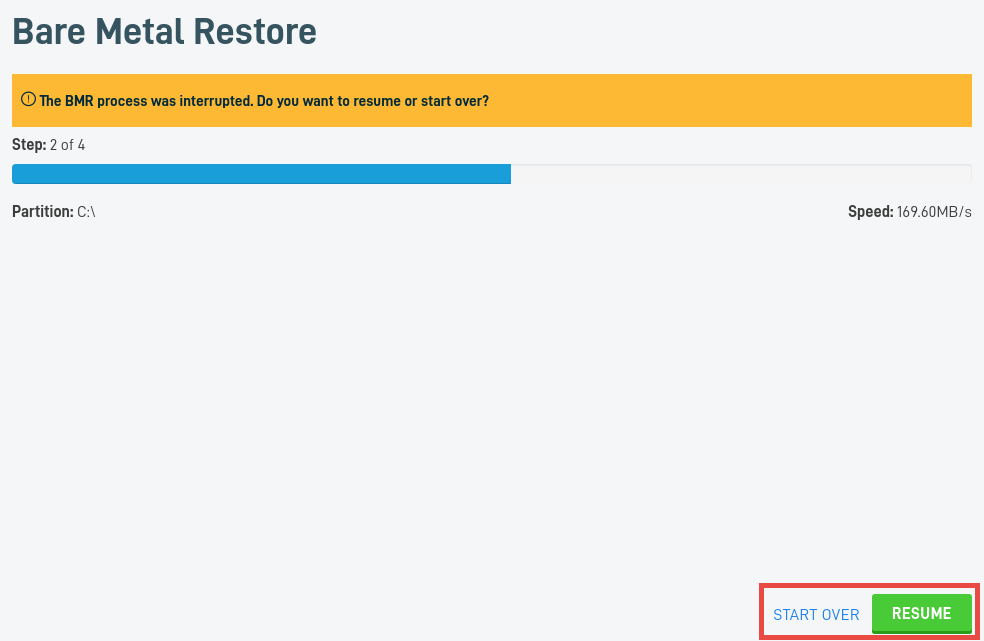
If you select the Start Over option, the Bare Metal Restore process will restart from the Booting the Target Machine From USB stage. You will lose any changes you have made to the Bare Metal Restore configuration up to this point.
If you select the Resume option, the Bare Metal Restore process will attempt to continue the data transfer from the point that it was interrupted.
NOTE When selecting Resume, the progress indicator may show the transfer resuming from up to 40 GB before the failure point. The BMR environment does this as a precaution against transferring any potentially-corrupted data.
This error message indicates that one or more snapshots taken by a Rescue Agent could not be written back to the production machine, possibly as a result of an unexpected crash or a reboot of the target hardware.
In the event that the mirroring process is interrupted, it will attempt to automatically resume. If the most recent snapshot the mirroring process captured is unusable because of the crash, the process will take another snapshot, and perform a differential merge between the new snapshot and the last good snapshot to reconcile differences between the two points.
If the production machine does not boot, you can reboot the target machine back into the Bare Metal Restore environment. 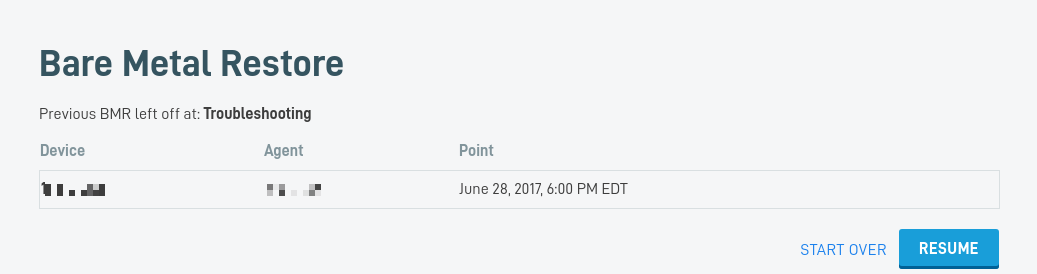
If you select Resume, the Bare Metal Restore environment will pick up where the process left off. Click Reboot to re-run HIR and attempt to restore bootability to the target machine.
If you select Start Over, the Bare Metal Restore environment will start the BMR process over from the begining.
If the production machine is still unable to boot, you can try troubleshooting the problem with Microsoft DaRT, a Windows boot CD, or any other tools at your disposal. Alternatively, you can contact Datto Technical Support for further assistance.


