Troubleshooting check-In errors
This article discusses troubleshooting cases where a Datto device does not check in to Datto's monitoring servers.
Environment 
- Datto SIRIS
- Datto ALTO
- Datto NAS
Description
The Datto appliance requires gigabit network connections to check-in successfully. If your Datto appliance does not complete the registration process or fails to check in, make sure you've set the port on the switch to which it is connected and the Datto appliance's primary NIC to negotiate the appropriate speeds.
On the organization's switch, make sure that the Datto appliance's dedicated port is set to a specific speed (i.e., 1000 Mbps).
See the Datto Networking Requirements article for more information.
Basic troubleshooting 
Browse to the Datto device's local IP address to see if the Remote Web is accessible, locally. By default, Local access to the Datto Device's Remote Web is disabled. If disabled, once the device is accessible remotely, you can re-enable local access under Configuration > Global Device Settings > Local Access Control.
If you can access the Remote Web, continue with the next step. If the page does not load, then onsite troubleshooting with a monitor and keyboard will be required.
Log in with the admin account created during registration.
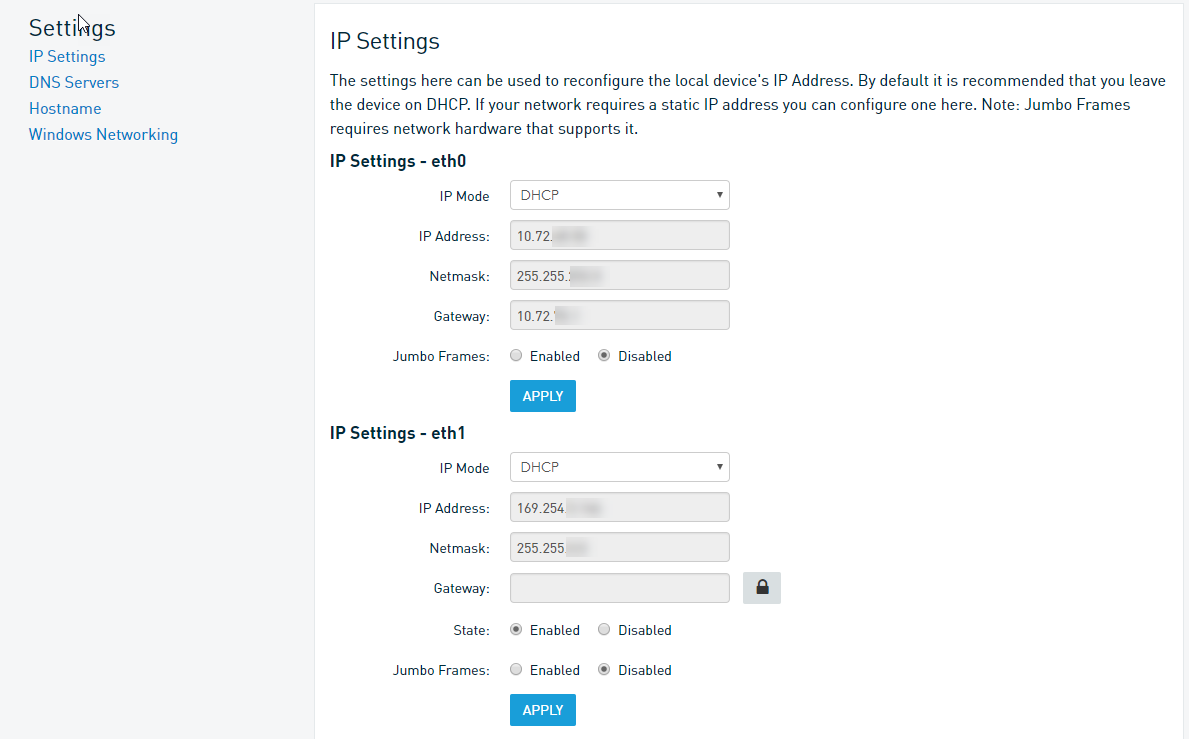
Navigate to the networking page: Configure > Networking.
Confirm the network settings are correct. Make sure that at least one Public DNS is present.
Verify that the ports intended for communication on your network (eth1, eth2, etc.) are not disabled.
On-site troubleshooting
You will need to have someone on-site to perform the following steps:
- Check all cable connections and try replacing the Ethernet cable.
- If the device has a redundant power supply, confirm all connections are plugged in. Having a power supply unplugged will put the device into a panic mode.
If the Datto device is off
- Power the Datto device on.
- Is the device on a battery backup? If the battery backup has diagnostics or logs, they can help determine if the battery backup is the cause of the power failure.
- If the device powers off again in the next few minutes, try another power source without the battery backup.
- If the device continues to shut off, the Datto device could be overheating. Check to see if the fans are running.
If the Datto device is on
- Was there a recent power outage? If so, you may need to reboot the Datto device.
- Are there any activity lights blinking? High disk activity normally indicates the device is performing backups.
- Attach a monitor and keyboard to the Datto device. Usually, this will be a VGA monitor or HDMI for ALTO3 and other smaller chassis models.
- If the keyboard is responsive, you can attempt to configure networking via the console and run the network test. If the networking test completes with no errors, then you should be able to check in.
- If the device does not respond to keyboard input, remove all other connections to the device (ethernet and USB) and re-test. If it is still not responsive, take a photo of the screen. It may help Datto Technical Support determine the cause of the problem.
If configured, you can attempt to connect via IPMI on SIRIS series 2, 3, and 4 devices. See the following articles for more information:
SIRIS 5 devices use iDRAC for remotely managing the device directly. For more information, see: Using iDRAC.
You can try connecting to the Datto device on the local network using putty via the device's local IP address over port 22.
Connect a keyboard, monitor, and mouse to the Datto device, and open a Terminal session by pressing CTRL+ALT+F2. Once logged in, enter the command:
su backup-admin
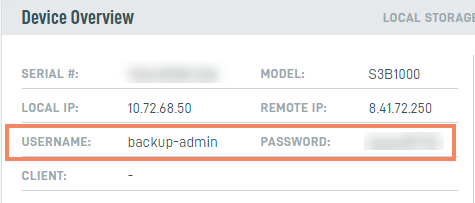
Enter your backup-admin password. You can find the backup-admin password on the Partner Portal by clicking on the appliance's name. You will find the password listed under the Device Overview heading.
Once logged in as backup-admin, enter the command
sudo -i
The screen should look similar to the example below

On the Datto appliance, connect a keyboard, monitor, and mouse to the Datto device.
Press CTRL + ALT + F1 to access the Command Line Interface (CLI).
Log in using the device's backup-admin username and password.
Command Line troubleshooting
Force a check in attempt manually through the command line. If the command returns errors, note the error message.
checkin
Run the following command to see if another device on your network is using the same IP address of the Datto appliance, for more information on arping and duplicate address detection mode ( -D), please refer to the manual pages.
arping -I <interface> -D <IP address of the Datto appliance>
EXAMPLE
root@ExampleDevice:~# arping -I br0 -D 10.72.69.62
ARPING 10.72.69.62 from 0.0.0.0 br0
^CSent 8 probes (8 broadcast(s))
Received 0 response(s)
root@ExampleDevice:~#
If the arping command does return a value, it means another nic is responding to the IP requested and will provide the mac address of that network adapter. Please note the mac address and compare it to other adapters on the device itself. It is not recommended to have multiple NICs connected to the same LAN if they are not bonded. Please refer to Device Auxiliary / Secondary NIC settings for more information.
Example of a request, returning a response:
EXAMPLE
sdroot@ExampleDevice:~# arping -I br0 -D 10.72.68.140
ARPING 10.72.68.140 from 0.0.0.0 br0
Unicast reply from 10.72.68.140 [00:D8:61:B1:02:43]  0.842ms
Sent 1 probes (1 broadcast(s))
Received 1 response(s)
root@ExampleDevice:~#
Turn off autonegotiation and manually set the interface to use the correct speed by running the following commands:
ethtool -s <Interface> speed 1000 duplex full
ethtool -s <Interface> autoneg off
reboot nowAttempt to register or check the device in again.
If the above step is successful, leave as is. If this fails, turn auto negotiation back on.


